Content
7.5.1 Shure WWB: Import a Show file generated by FreqCoord
7.5.2 Shure WWB: Import a CSV file generated by FreqCoord
7.5.3 Wisycom Manager: Import a CSV file generated by FreqCoord
7.5.4 Sennheiser WSM: Import a CSV file generated by FreqCoord
8.1 Coordinate frequency requests
8.1.1 Calculation Settings per Device
8.1.2 Global Calculation Settings
8.3 Show and Modify Interference
12.1 Create an Event Location Template
12.2 Add/Edit Permanent Frequencies
12.3 Using an Event Location Template
1 Introduction
Wireless microphones and in-ear monitor systems are widely used in events, conferences, theatre-, radio- and TV-productions. These devices work mainly within frequency bands that are also used by digital terrestrial television (DTT). Frequency authorities have continually restricted the usable frequency range for these wireless devices and exempted them from the licence-obligation.
This situation leads to difficulties for the users to know if a licence is needed for their devices. On the other hand, the risk of interference between licence-free wireless devices at large events is exceptionally high. Therefore, at large events, a Frequency Manager is often contracted to coordinate these devices among all users.
FreqCoord is a mobile-optimized WebApp which makes frequency coordination for events easy. That leads to a smooth operation of wireless devices for all users. Users of wireless devices can sign up for events easily using device presets, check if the device needs a licence from the corresponding authority, and directly generate an application form (CH & DE). For frequency managers, FreqCoord makes frequency coordination for events easy and cost-effective. Also, FreqCoord shows the DTT interference situation in Switzerland and Germany.
Website address: https://freqcoord.com/
2 Features and Prices
Signing up frequencies for an event and standard features are free of charge. As a frequency manager or event organiser, you can buy a FreqCoord Licence to use additional features, making your work on FreqCoord even more efficient. The saved time will compensate for the licence costs easily.
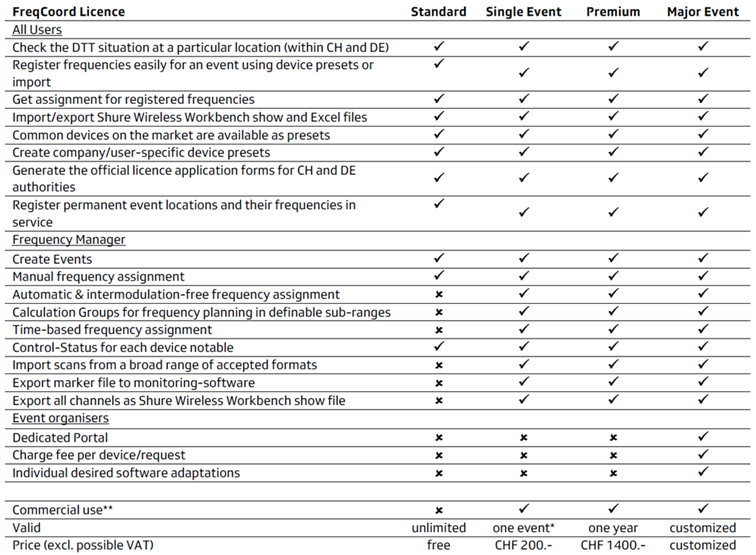
* Valid for one event with an event duration up to one month. Longer event durations incur proportional charges (e.g., 2 months = 2 x 200.-). The timing of purchase does not affect the price.
** Use of FreqCoord as contracted Frequency Manager for an event.
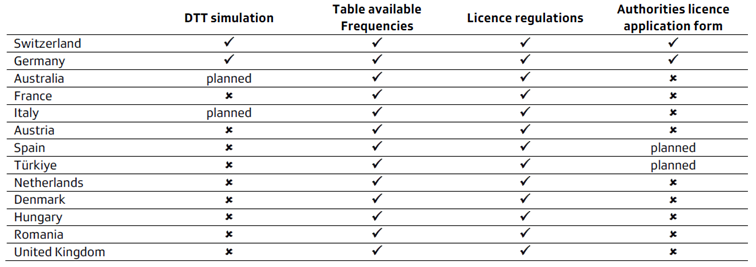
3 Country-specific features
In the following table, you can see which FreqCoord features are available in different territories. Do you miss a feature in your country and wish that it would be implemented? Then contact us via email.
4 General Information
4.1 Create User Accounts
To use FreqCoord you must set up a personal account. The FreqCoord account is free of charge. You can create an account by clicking on the "Create Account" button on the FreqCoord website.
When you create an account, the role "Individual User" will automatically be assigned to your account. If you belong to an already registered company or create a new company, please send an email to support@freqcoord.com.
4.2 Edit Account Information
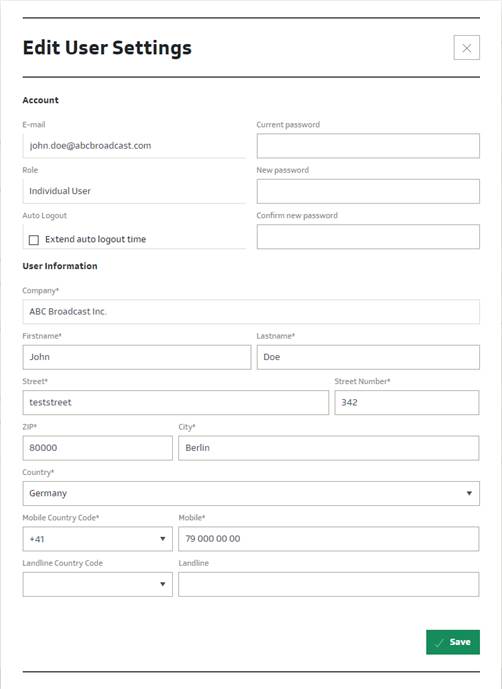
After logging in,
you can see and edit your account information and password by clicking on the
account symbol ![]() . Individual users can also edit their email address.
. Individual users can also edit their email address.
You can also see your user role and additional permissions.
4.3 User Roles
Application users have one of the following roles:
|
User role |
Individual User |
Company User |
HF Officer |
|
Description |
Individual User |
User belongs to a company |
Administrator of a company |
|
How to get this permission? |
create account on https://freqcoord.com |
Request via mail to support@freqcoord.com |
Request via mail to support@freqcoord.com |
|
Events |
create, view and register |
create, view and register |
create, view and register |
|
Manage events |
as assigned frequency manager for your events |
as assigned frequency manager for an event |
All events managed by the own company |
|
Interference situation |
view |
view |
view |
|
My devices |
create devices & use |
use |
create devices & use |
|
My Company |
view & edit own information |
view own company users |
view & edit own company information |
A user can be granted additional permissions for specific tasks, including "Frequency Manager" (manage events) and "Template Frequency Editor" (add or change frequencies stored for an event location).
4.4 Security
Communication between your browser and the application is encrypted.
The emails sent by FreqCoord are not encrypted. Therefore, the application enforces a password change after you have received a password from the application (for example, for a password reset).
4.5 Privacy
Your contact details are usually only visible to users of your company. However, if you are assigned as a frequency manager to an event, you should be aware that all registered users (including Individual Users) can see your contact information.
FreqCoord is hosted on Microsoft Azure in Switzerland. According to the European Commission’s list of states, this country provides an adequate level of data protection.
5 Home & Menu Bar
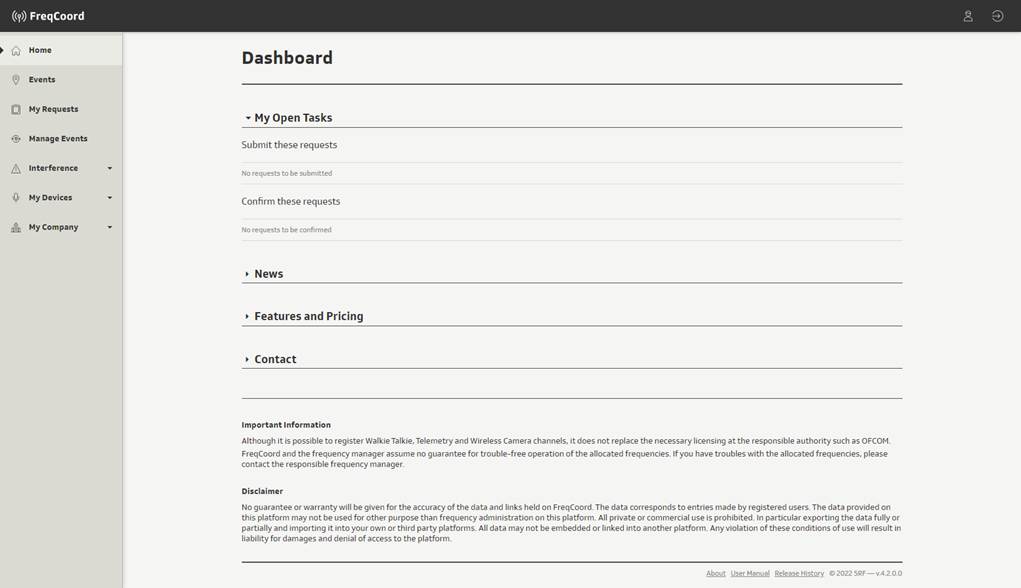
The landing page after login shows a personalised dashboard. You will see your open tasks, news, features & pricing, and the support contact of FreqCoord.
The menu bar provides access to the main functions of the application. Menu items with an arrow contain submenu items. The number of menu items you have depends on your user role. The features are explained in detail in the following chapters.
6 Events
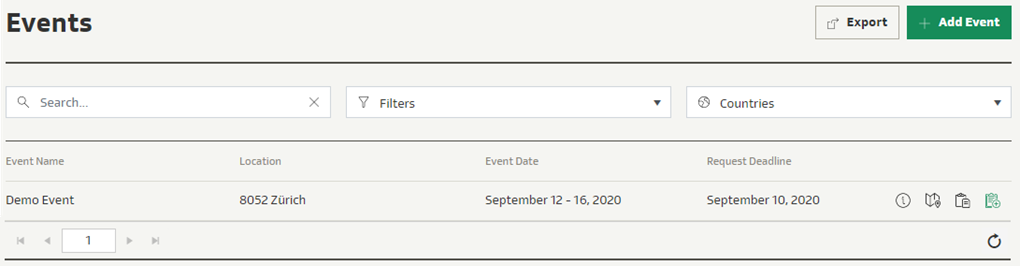
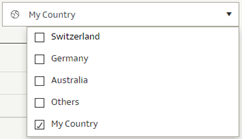
The table "Events" displays all the coordinated events. It is filtered by default to the user’s home country.
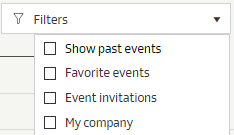
Quick filters are available to limit the events shown in the table.
Furthermore, you have a quick search field, which allows you to filter the table for any text displayed in the table.

FreqCoord includes tools to help you view and change event data. The availability of these tools depends on your account’s role and on the organisation, you belong to.
|
|
Show event details |
|
|
Zoom to the event on the map |
|
|
Copy this event |
|
|
Create a Request for this event |
Users can create new events by clicking on "Add Event". You can also add events by copying the properties of existing events (excluding date and time). Just press the button “Copy event” of the event you wish to copy. Please note that only users with the property "Frequency Manager" set can be selected as frequency managers for an event. HF-Officers can change this property. If you do not insert X/Y coordinates for your event, the application tries to find approximate coordinates using the specified address.
You can export
event information to a text file (comma separated) by clicking first on the export
button. Then select the checkbox of one or more events in the table and
clicking on the button ![]() .
.
7 My Requests
There are three options for requesting frequencies for an event:
1. Click on the event-specific link that you received by email. Then log in with your email address and password.
2. Select the event in "Upcoming Events" on the homepage.
3.
Log in on https://freqcoord.com and select "Events" in the main menu. Click on the desired
event in the list or click on the "Create request" icon ![]() to start the request
process.
to start the request
process.
Please note: You need to have an account to request frequencies for an event on FreqCoord.
7.1 Create a Request
7.1.1. Request – Step 1
In the first step, you will be asked to fill general information about your frequency request.

|
Request Title* |
In this input field, you should fill a name that identifies your request. E.g., "Unilateral Production Channel 8" or "Host broadcaster" etc. |
|
Location of Use* |
This input field should contain the location where the production will happen. Choose an already existing location from the dropdown menu or create a new location by typing a free text. |
|
Period of Use* |
Here you should fill the period in which you will use your wireless devices on site. If available, you can "-- Select time slot preset --" or set "Start*" and "End*" manually. |
Please note: If your devices are to be used at different locations within the same venue, a separate request must be completed for each of those locations (hall, studio, stage A, etc.). For example, if device 1 is used in location A and device 2 is used in location B, two separate requests need to be created.
To get to the next step, click the "Continue" button.
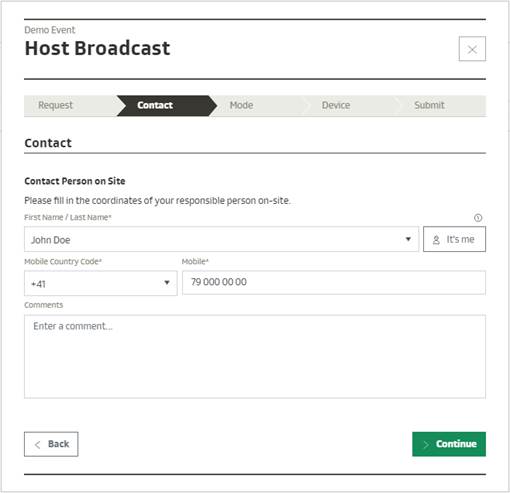
7.1.2. Contact – Step 2
In this step, you are asked to sign up for the person who will be later using the registered wireless devices on site. This person will be the contact person for the frequency manager on site.
|
It’s me |
Click on this checkbox if you are the person who will be the person using the registered wireless devices on site. |
|
Name* |
Enter the name of the person who will use the registered wireless devices on site. The name will be taken automatically from your account information if you click "it’s me". |
|
Mobile* |
Enter the mobile phone number of the person who will use the registered wireless devices on site. The phone number will be taken automatically from your account information if you click "it’s me". |
|
Comments |
You can add some general comments about your request here. |
Please note: By clicking the next button, your request will be saved. You can log out and sign in again, and you’ll find your request in the list under "My requests". Click on your saved request to continue.
To get to the next step, click the "Continue" button.
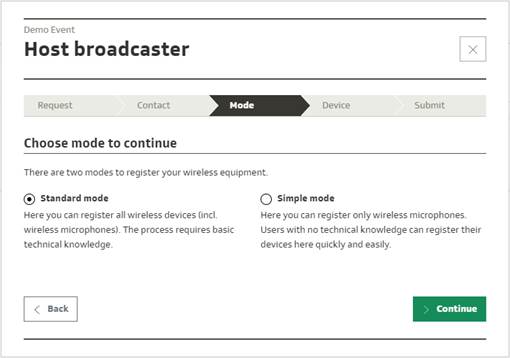
7.1.3. Choose Mode – Step 3
There are two modes for
adding your wireless devices.
|
Simple mode |
Click on the simple mode button if you need to request only wireless microphones. This mode is also for all users with little technical knowledge. |
|
Standard mode |
Click on the standard mode button to add different devices like wireless microphones, in-ear monitor systems, walkie talkies, etc. This mode is also for users who want to specify all their devices and therefore need basic technical knowledge. |
Please note: You can switch modes at any time during the request process.
7.1.1 Simple Mode
The next few steps in these instructions show the process in the simple mode.
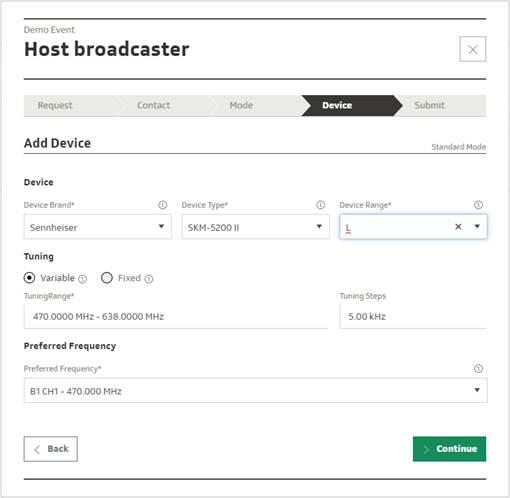
7.1.1.1 Add Device – Step 4
|
Device Brand* |
This field contains the name of the brand of the wireless microphone. You can choose an existing entry from the dropdown list or type in a new value if it’s not already in the list. |
|
Device Type* |
This field contains the model name of the device. You can choose an existing entry from the dropdown list or type in a new value if it’s not already in the list. |
|
Device Range* |
This name contains the name of the frequency range/band. Block name given by the manufacturer. You can choose an existing entry from the dropdown list or type in a new value if it’s not already in the list. |
Please note: Further input fields will then appear.
|
Tuning |
select whether your device is tuneable "Variable" or operates on fixed frequencies "Fixed". |
|
Variable |
Choose the lowest and highest adjustable frequency in the fields "from" "to" |
|
Fixed |
Add all frequency options which your device provides. Choose from the dropdown list. |
|
Preferred Frequency |
Select or type a preferred frequency you wish to use. |
Please note: If you enter free text, you must complete all parameters of the device manually.
Useful tip: To allow frequency requests to be created quickly and easily, details of the most common devices on the market are already stored in FreqCoord. You or your company's HF Officer can enter additional device presets under "My Devices" in the main menu. Once all the device parameters have been saved as a device preset, you can use them in future requests.
To save the device and get to the next step, click the "Continue" button.
7.1.1.2 Submit – Step 5
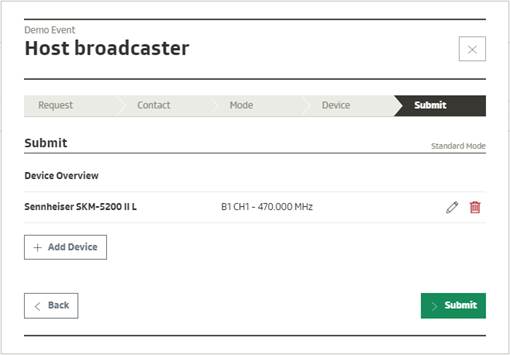
Here you see an overview of the devices you have registered. To add a further device, select "Add Device". Once you have entered all the devices, click on the "Submit" button.
Please note: Your request will only be sent to the frequency manager by clicking the submit button.
7.1.2 Standard Mode
The next few steps in these instructions show the process in standard mode.
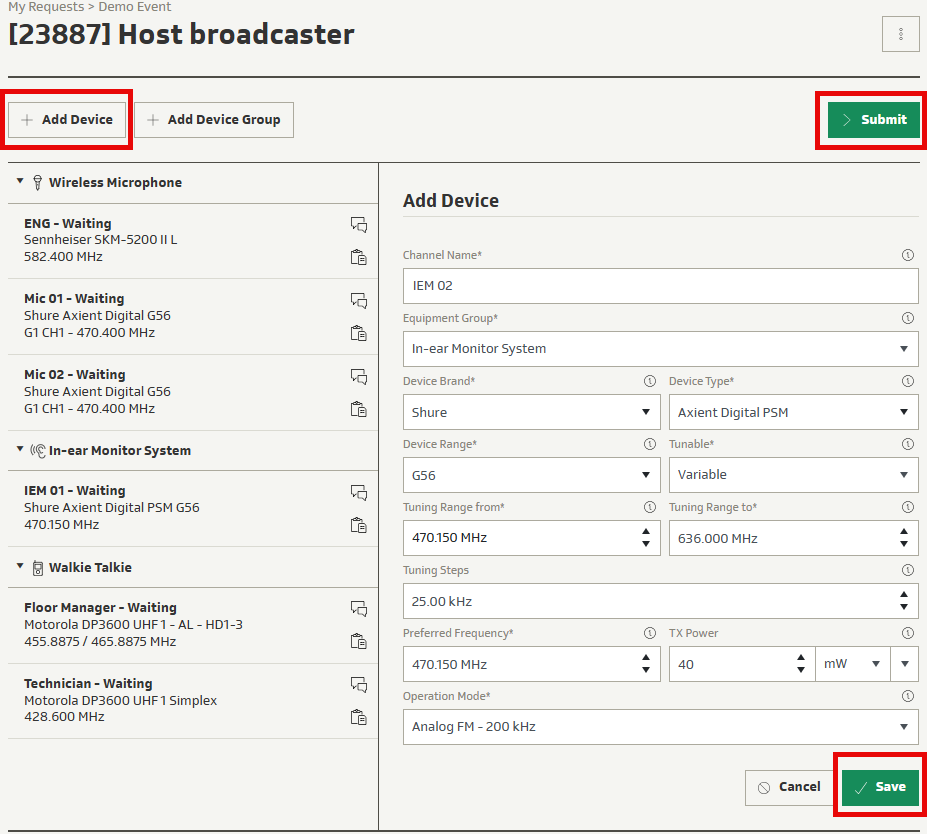
Once you have entered all the devices, you must send the request to the frequency manager by clicking the "Submit" button. Otherwise, the frequency manager will not see your request.
When you have submitted your request, it will be checked by the frequency manager for this event after the frequency request deadline.
Click on the "Add Device" button. Input fields will appear on the right-hand side. Please enter a name for your device in the field "Channel Name". Then choose the "Equipment Group" of your device. This could be a wireless microphone, an in-ear monitor system, or further options.
Complete the fields Brand, Type, and Range. For the latter, you can enter free-text or choose one of the device presets from the drop-down menu.
If you enter free text, you must also complete all the device parameters manually. In the "Tuneable" field, select whether your device is tuneable or operates on fixed frequencies. Further input fields will then appear. If a device has multiple operation modes, a dropdown selection appears. Please select the operation mode you want to use. To save the device, click "Save".
Here, you can register pre-configured sets of devices directly. Typically, these are sets that are built into flight cases or a vehicle. If you choose a device set, you must enter information for each device. If you do not require a device from the group, click on "Skip".
The following functions are available on this page:
|
|
Add a new device |
|
|
Add a preconfigured set of devices to this request |
|
|
Submit the request to the frequency manager after you have added all the devices you need |
|
|
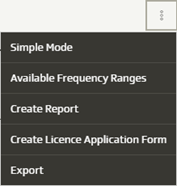
Open the submenu for additional functions |
|
Switch to the simple mode, where you can only sign-up wireless microphones |
|
|
Shows a popup with the available frequency range in the event country |
|
|
Create a PDF report of all your devices in a request |
|
|
Create an application form for the responsible frequency authority for devices you have declared as "not licenced yet". This function is just for Events in Switzerland and Germany available. |
|
|
Import and Export the devices from/to an Excel file/Shure Wireless Workbench show file. Additionally export frequencies to CSV in the Manufacturer’s Remote Control Software format. |
|
|
|
Add comments to this device or read comments from the frequency manager |
|
|
The device has a new comment from the frequency manager |
|
|
The device has a read comment from the frequency manager |
|
|
Create a copy of the currently selected device once or multiple times |
|
|
Save the current visible device |
|
|
Do not save the device which you are currently adding/editing |
|
|
Save All the devices currently in the pile editor. This button will be greyed out if some devices are not entirely preconfigured, or some licence declaration information is missing. |
|
|
Do not save the currently visible channel in the pile editor. |
|
|
Accept a frequency change suggested by the frequency manager |
|
|
Press this button if the suggested frequency does not work for you. Please propose another preferred frequency. |
|
|
The replace button appears if a device has the status "denied". Please use this button to replace it with another device. |
|
|
Edit the selected device. This sign will not appear if you have already submitted the device as long as you get the assignment from the frequency manager. If you need to make changes, contact the frequency manager. |
|
|
Delete the selected device. This sign will not appear if you have already submitted the device as long as you get the assignment from the frequency manager. If you need to make changes, contact the frequency manager. |
|
|
Show the device details of the previous device in the list |
|
|
Show the device details of the next device in the list |
To allow frequency requests to be submitted quickly and easily, details of the most common devices on the market are already stored in FreqCoord. You or your company's HF Officer can enter additional device presets under "My Devices" in the main menu. Once all the device parameters have been saved as a device preset, you can use them in future requests. Device groups can also be created under "My Devices". Entire sets of devices can thus be preconfigured.
7.2 Copy Request
If you will use the same equipment in different events, you can copy an already made request.
1. Open the main Menu events and click on "My Requests" in the menu to see a list of all the events for which you have submitted a request.
3. Click on the copy symbol of the request you would like to copy.
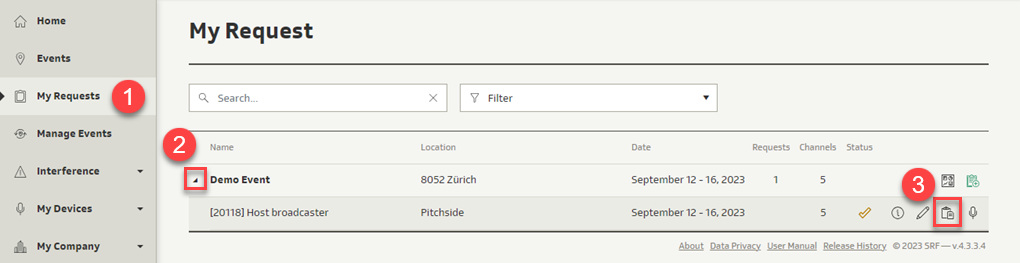
4. Select the copy destination event you would like to copy to the copy source request. You may type in the input field to search in the dropdown list.
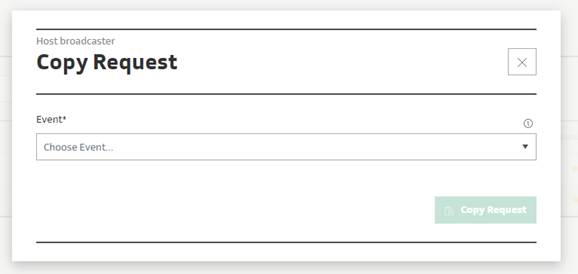
After selecting the event you will follow the create request process. You need to set the period of use of the request newly. For devices with a licence obligation, you may need to declare the licence status.
7.3 Edit & Review Request
7.3.1 Event/Request View
After you submitted a request, you can manage your requests in the menu item "My Requests". FreqCoord will display an overview of events with requests you have submitted. You can also show requests made by your company and previous events by selecting the corresponding filter.
Usually, the frequency manager will process your request once the request deadline has passed. Once he has processed your request, you will receive an email notification.
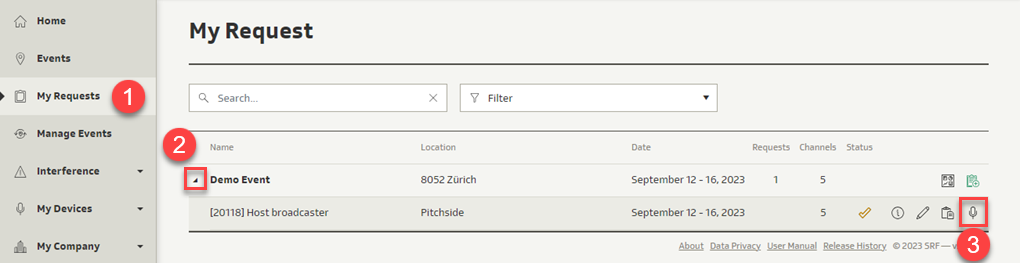
1. Open the main Menu "My Requests" to see a list of all the events for which you have submitted a request.
2. Click on the expand arrow to see the individual requests for this event.
3. Click on the "Devices" icon to show the devices included in the request.
The following functions are available on this page:
|
This button allows you to create a report of an event with the frequencies requested by you or your company. This report contains all the requests for this event. |
|
|
|
Create an additional request for this event (e.g., for another location) |
|
|
Show request details |
|
|
Edit request information |
|
|
Copy request to another event |
|
|
In the following table, you see the description of each possible request status:
|
Request status |
Icon |
Description |
|
draft |
|
The request has been created by the requesting user but not yet submitted to the Frequency Manager. The Frequency Manager cannot see your devices and process your request until you have submitted your request. |
|
submitted |
|
The request has been received and is in progress to be coordinated. |
|
to review |
|
The request has been assigned. Some of the channels have the status changed or denied. If your request only contains channels with status "changed", you can confirm them. But no further steps will be needed before use. If some channels have the status "denied", please sign up another device. |
|
completed |
|
The request has been assigned, and all channels of the request have the status "allowed". No further step is needed before use. |
|
archived |
|
The request has been archived. The status can be set after the period of use and after the wireless devices are not active anymore. |
7.3.2 Device View
This page shows you all the devices included in a request.

The frequency manager has set a status for each device. Please review the assigned frequencies carefully and confirm those devices that have been given the status "Changed".
The functions of this page are described in the chapter Standard Mode.
Each device can have the following status:
|
Waiting |
The frequency manager has not yet coordinated the device. Please wait until you receive an email. |
|
Allowed |
The frequency manager has approved your preferred frequency. |
|
Changed |
The frequency manager has changed your preferred frequency and suggested another frequency. If possible, please accept the new frequency using the "Accept" button. |
|
Denied |
The frequency manager has not found a suitable frequency in the range which your device supports. Please replace it with another device or contact the frequency manager for additional information. |
|
Assigned by Authority |
Devices with this status are not being coordinated by FreqCoord. The user will get the assignment directly from the responsible frequency authority. |
7.4 Create PDF-Report
To simplify work at the event, a list of all the frequencies can be exported in a pdf file.
To create a report of all your requests for a given event, click on the "Create Report" icon in the overview window under My Requests.
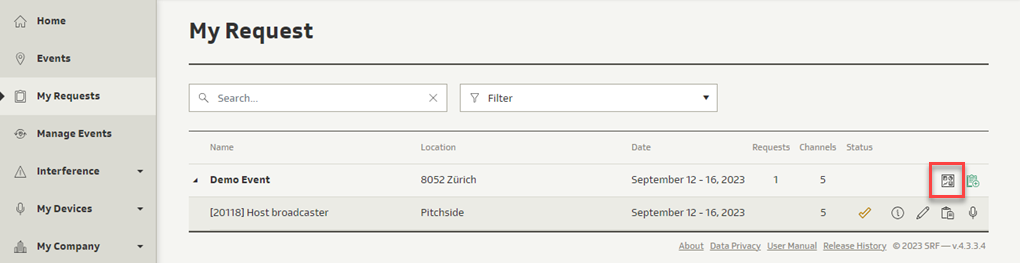
To create a report for a single request, enter the device view, open the overflow menu, and click on "Create Report".
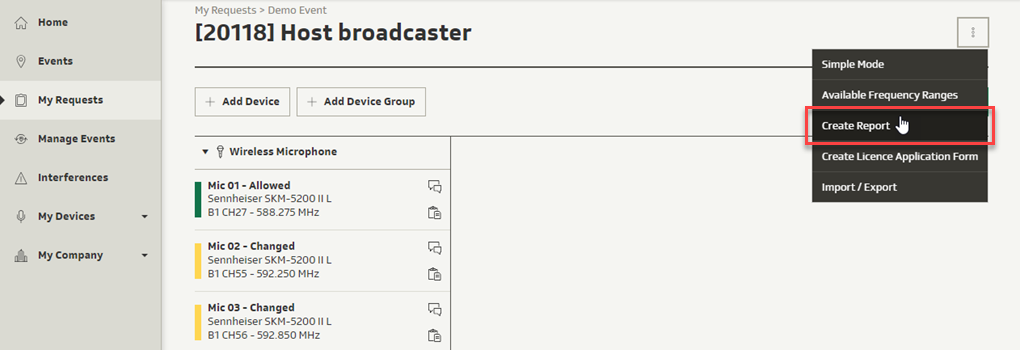
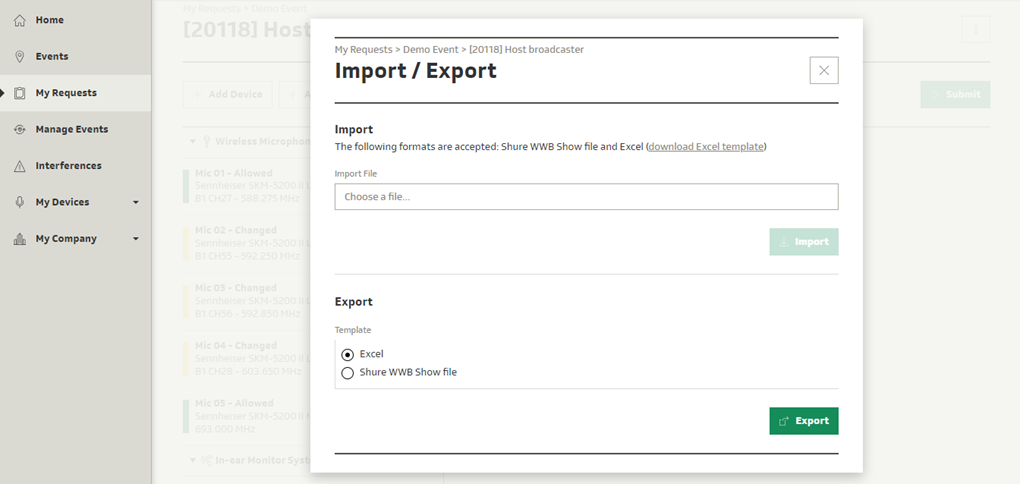
7.5 Import / Export
FreqCoord provides the option to import or export devices of a specific request. Enter the device view, open the overflow menu, and click on "Import / Export".
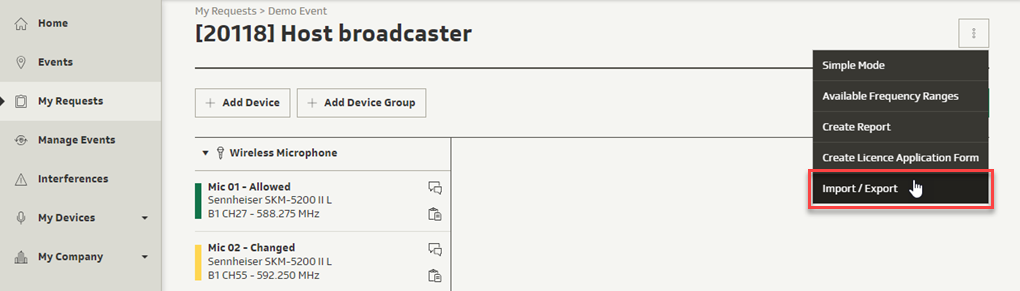
In the subsequent popup you have the option to Import or Export Excel-, Shure Wireless Workbench show- and Manufacturer’s Remote Control Software CSV- files.
Please consider the following specific information:
|
Template |
Import |
Export |
|
Excel file |
· Please use only the provided template · To update devices, fill request and channel number |
· Exports all devices · Can be used for re-import, backup or future requests |
|
Shure Wireless Workbench Show file |
· Imports and adds exclusively Shure remote-controllable devices |
· Exports devices of the brand “Shure” with device status “allowed” and “changed” · If previously an Import was done, the imported file will be updated with the assigned frequencies. · Can be used to configure your Shure hardware with the assigned frequencies. |
|
Manufacturer’s Remote Control Software CSV file |
· CSV import is not supported |
· Exports devices of the brand “Shure”, “Wisycom” and “Sennheiser” with device status “allowed” and “changed” · Can be used to import the assigned frequencies in the above-mentioned brand’s remote control software |
7.5.1 Shure WWB: Import a Show file generated by FreqCoord
The Shure Wireless Workbench Show file exported with FreqCoord can be used to configure your Shure hardware with the assigned frequencies. If the export is based on a previous import, the assigned frequencies will be automatically deployed on the right hardware. If the export was not based on a previous import, please follow the instructions below.
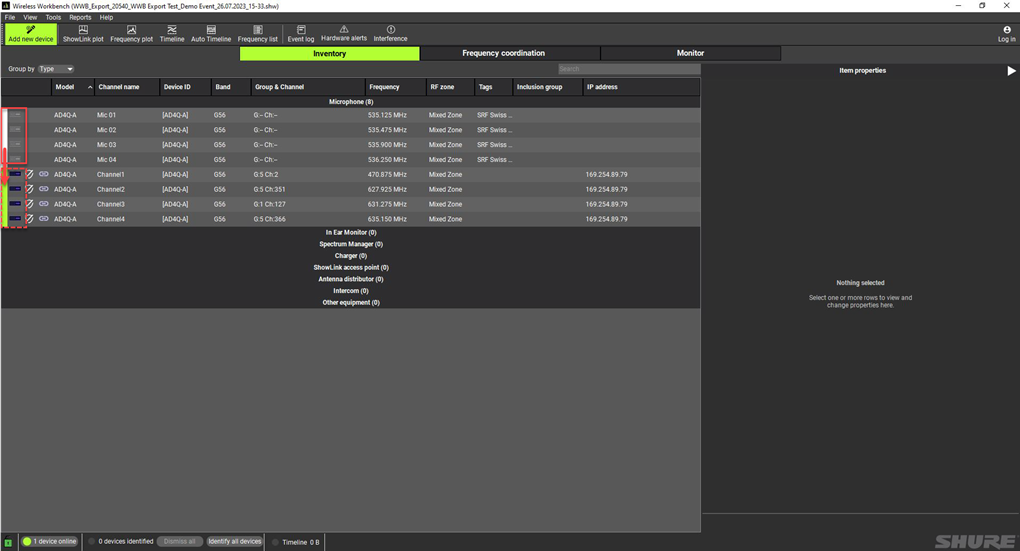
Open the Show file exported with FreqCoord and connect your Shure hardware to the computer. In the Inventory tab, the devices exported by FreqCoord will appear with a grey bar on the left side. Your connected hardware will appear with a green bar on the left side.
To deploy the assigned frequencies exported by FreqCoord to your hardware, drag and drop in the red marked region, the grey (offline) devices to the green devices or vice versa.
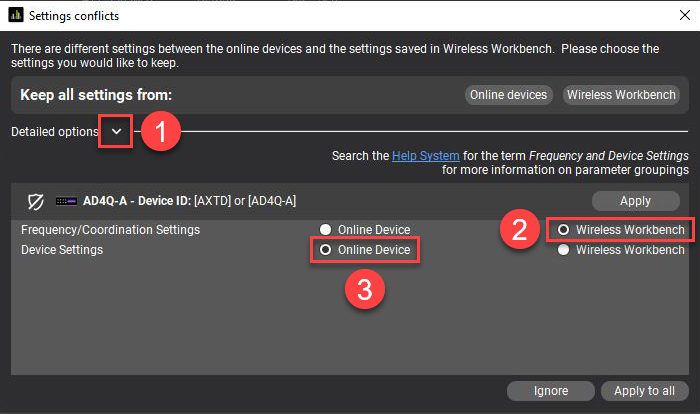
After this operation Workbench will inform you about a settings conflict. Follow the subsequent steps:
1. Expand the detailed options.
2. Choose for Frequency/Coordination settings “Wireless Workbench”, which will take the Frequency and Zone exported from FreqCoord.
3. Choose for Device Settings “Online Devices” if your devices are already preconfigured. All the configuration (incl. channel name) of your online devices will be kept, except the Frequency and Zone (point 1)
4. Click on “Apply to all” to complete the device configuration.
7.5.2 Shure WWB: Import a CSV file generated by FreqCoord
This chapter describes how to import a CSV file exported from FreqCoord using the option “Manufacturer’s Remote Control Software CSV file”. After downloading the export, unzip the file. The extracted folder contains one csv-file per device/type/range/operation mode for supported manufacturers (Shure, Wisycom, and Sennheiser). For import into the Shure Wireless Workbench software, only the files with name “Shure….csv” are in a format Shure WWB can read.

To import the Shure CSV-files, open Shure WWB and follow these steps:
1. switch to the Tab “Frequency Coordination”
2. Click on the Import-Button
3. Browse and select the first “Shure…csv” file out of the unzipped folder
4. Set “type”, “band” and “RF profile” according to the file name and click on the import button. Then repeat Step 2-4, for each further file with the name “Shure…csv”

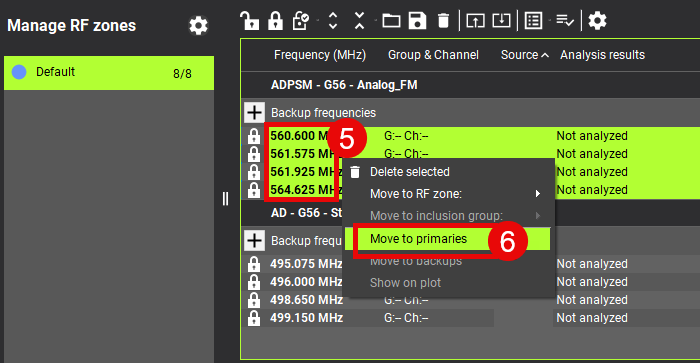
By default, imported frequencies appear as Backup frequencies. Select all frequencies of one device/type/range/operation mode combination (5), right click and select “Move to primaries” (6). Repeat step 5-6 for any further imported frequencies.
7.5.3 Wisycom Manager: Import a CSV file generated by FreqCoord
This chapter describes how to import a CSV file exported from FreqCoord using the option “Manufacturer’s Remote Control Software CSV file”. After downloading the export, unzip the file. The extracted folder contains one csv-file per device/type/range/operation mode for supported manufacturers (Shure, Wisycom, and Sennheiser). For import into the Wisycom Manager software, only the files with name “Wisycom….csv” are in a format Wisycom Manager can read.
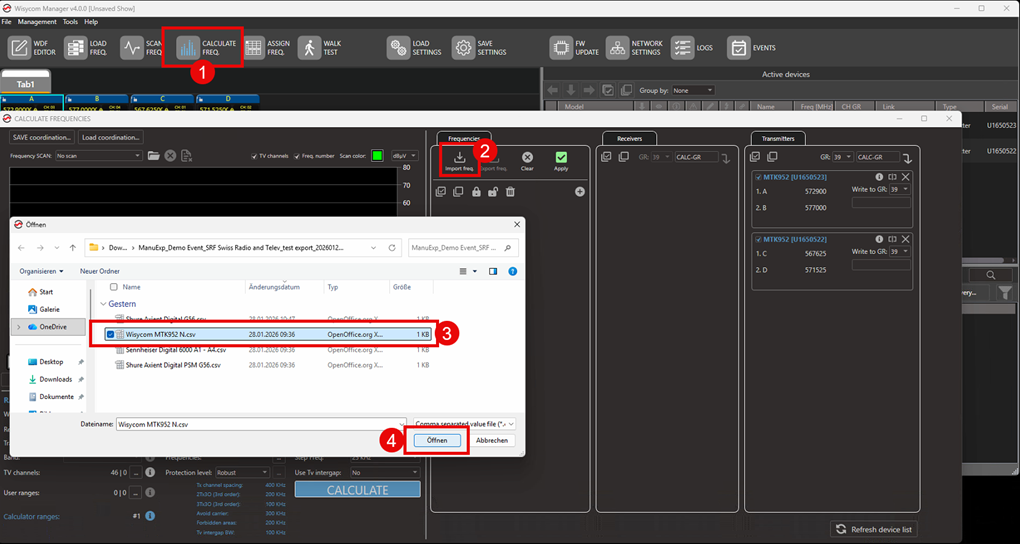
To import the Wisycom CSV-files, open Wisycom Manager and connect the devices you like to configure. Then follow these steps:
1. Open the “Calculate Freq” tab
2. Click on the “Import Freq” button
3. Browse and select the first “Wisycom…csv” file out of the unzipped folder
4. Click on the “Open” button
5. Select a Channel Group where you want to write the frequencies
6. Transfer the selected Group to all online devices clicking on the arrow
7. Select all imported frequencies
8. Click on the “Arrow” button to move the imported frequencies to the online devices. You may also drag and drop one by one to the devices.
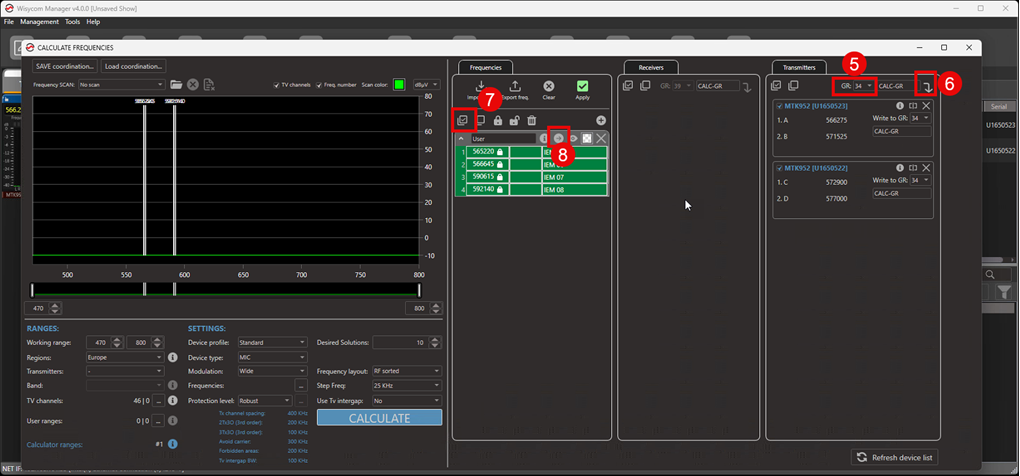
9. Apply the changes to all devices

10. Select all devices by holding the mouse left-click while moving over all devices.
11. Then right-click and select “Assign Frequencies”
12. Select the channel group previously in step 5 chosen.
13. Configure the imported frequencies to the devices.
7.5.4 Sennheiser WSM: Import a CSV file generated by FreqCoord
This chapter describes how to import a CSV file exported from FreqCoord using the option “Manufacturer’s Remote Control Software CSV file”. After downloading the export, unzip the file. The extracted folder contains one csv-file per device/type/range/operation mode for supported manufacturers (Shure, Wisycom, and Sennheiser). For import into the Sennheiser WSM software, only the files with name “Sennheiser….csv” are in a format Sennheiser WSM can read.
To import the Sennheiser CSV-files, open Sennheiser WSM and connect the devices you like to configure. Then follow these steps:
1. Open the Frequency Manager – Professional Setup

2. Switch to the tab “Frequencies/Bands”
3. Browse and select the first “Sennheiser…csv” file out of the unzipped folder
4. Click on the “Open” button

5. Switch to the “Coordination” tab.
6. Start the coordination and after appearing some results pause it.
7. On the left side you see the result table. For some result options, the number of the result priority “Hi” should correspond with the number of imported devices. Select one of the options with matching number.

8. Switch to the “Allocation” tab.
9. Allocate automatically if you only manage one device type. Otherwise, you maybe manually assign by drag and drop frequencies from the frequency list (left) to the devices (right).
10. Push the “Send to connected devices…” to deploy the frequencies to the devices.

8 Manage Events
Designated "Frequency Managers" for an event and HF-Officer’s can manage frequency requests in the "Manage Events" menu item of FreqCoord. "Manage Events” provides an overview of all events you are assigned to manage.

The following tools are available:
|
|
The event contains requests pending to be processed |
|
|
Show event details and delete the event |
|
|
Buy FreqCoord License |
|
|
|
|
|
Click to open the sub-menu for more options |
|
Edit the event |
|
|
Go directly to the Admin page of the event |
|
|
Go directly to the Interference page of the event |
|
|
Go directly to the Event Settings page of the event |
|
|
Show a QR-Code or a hyperlink which leads directly to the frequency request for the event |
8.1 Coordinate frequency requests
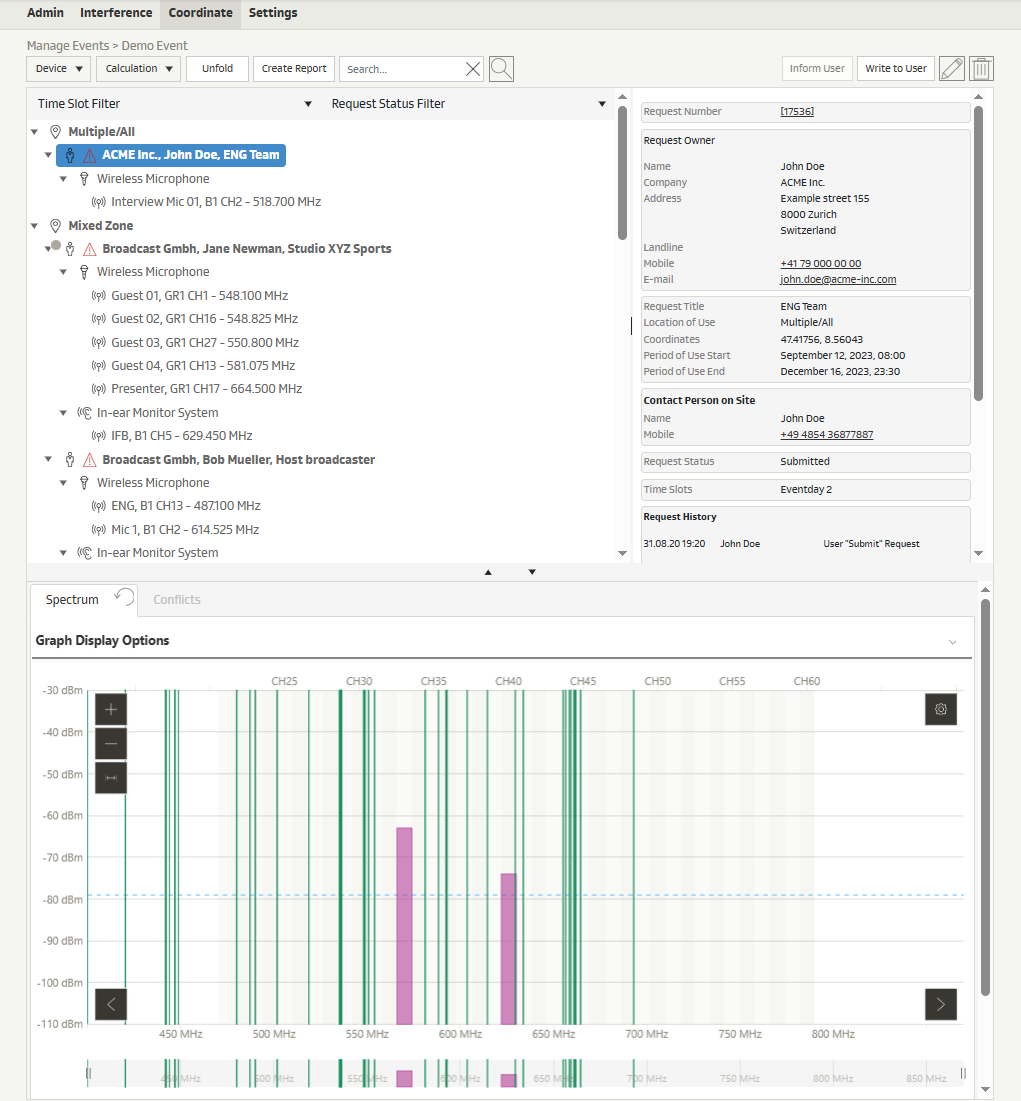
This page shows you all the requests for an event made by users. On the left, FreqCoord displays all frequency requests grouped by "Location of use" and request. On the right, the application shows details of the currently selected device or request. At the bottom of the page, you can switch between the spectrum- and the conflict-view, which shows all frequency conflicts. You can carry out your frequency disposition here.

This page offers you the following tools:
|
|
Click on this submenu to see the following functions: |
|
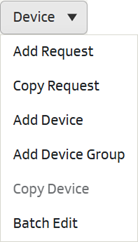
Add a new request to this event. You must select a request owner from all FreqCoord users. |
|
|
Copy the selected request to another event |
|
|
Add a new device to the currently selected request. This function is only available if a request is selected. |
|
|
Add a preconfigured set of devices to this request |
|
|
Copy the currently selected device. This function is only available if a device is selected. |
|
|
Enable or exit the Batch Editor |
|
|
|
Click on this submenu to see the following functions:
|
|
Check for conflicts between all registered devices and DTT interferences.
|
|
|
Calculate compatible frequencies for all registered devices and set a temporary status. This function is only available with a FreqCoord Single Event / Premium Licence.
|
|
|
Set the temporary status of devices "auto allowed" and "auto changed" to the definitive status.
|
|
|
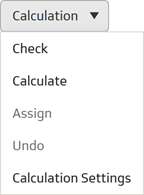
Undo the last operation. Only the functions "Calculate" or "Assign" can be undone. After reloading the page, undo doesn’t work.
|
|
|
Opens the setup popup to configure how FreqCoord should calculate conflicts. |
|
|
|
Unfold and fold the whole tree-structure in the left frame with one mouse click. For a better overview, the default view is folded. |
|
|
Create a report of this event with all requested frequencies/applicants in pdf, xlsx or create a monitoring marker file* (PMSE-OR, Winradio, Shure WWB Show File or Aaronia RTSA Suite Pro). * This function is only available with a FreqCoord Single Event / Premium License |
|
|
Search for any term in the tree-structure. E.g., search for frequencies, names, companies, and the selection jumps to the results. If you search again, you will get to the next search result. |
|
|
Send an email to the request-owner to inform him that the request has been coordinated and set request status to "to review" or "Completed". In this moment the assigned frequencies will be deployed and visible to the request-owner. |
|
|
Send an email to the request-owner for any clarification regarding the request. |
|
|
Set the status of the currently selected device to "allowed". |
|
|
Change the preferred frequency for the currently selected device. |
|
|
Check the currently preferred frequency for the selected device. |
|
|
Calculate a new preferred frequency for the selected device. |
|
|
If calculate can’t find a solution (auto-denied), “Find Best” calculates a new preferred frequency for the selected device without changing parameters in challenging scenarios, providing a quick solution with the least and least important conflicts. |
|
|
Undo the calculation of the selected device. |
|
|
The user can force the application to calculate a preferred frequency in a specific range within the device’s tuning range. By default, the calculation range will be set to the tuning range of the device. |
|
|
Deny the frequency for the currently selected device. Possible reasons: lack of flexibility in frequency adjustment options, incomplete device data, or the frequency range is not allowed. Please contact the user to find an acceptable solution. |
|
|
Set the status of the currently selected device to "assigned by authority". You can use this button to indicate to the user that this device is being assigned by the responsible frequency authority and is not being coordinated by FreqCoord. This button only appears if the device’s licence field is set to "not licenced yet". |
|
|
Reset the status of the currently selected device to "waiting". |
|
|
Select a calculation group for the device(s) selected. |
|
|
Select a spacing profile for the device(s) selected. |
|
|
Set a control status for a device(s) selected. For example, when the frequency manager checks and gives stickers to users, which have set up their frequency correctly. |
|
|
Edit currently selected device/request. |
|
|
Delete currently selected device/request. |
|
|
This sign shows you that you have unfinished tasks in this request. Assign frequencies for all devices and inform the user with the “Inform User” button to complete your work. |

Each device can have the following status:
|
|
The device has not been coordinated and has the status "waiting". |
|
|
This device has the definitive status "allowed". |
|
|
You have assigned a new preferred frequency to this device. |
|
|
This device has the definitive status "assigned by authority". It won’t be included in the calculation because the frequency authority will do the assignment and most likely change the frequency. |
|
|
You have assigned the definitive status “denied” to this device. It won’t be included any longer in the calculation. |
|
|
Auto status is set by the function "Calculate". To set to definitive, please click on "Assign". |
|
|
Auto status is set by the function "Calculate". To set to definitive, please click on "Assign". |
|
|
Auto status is set by the function "Calculate". To set to definitive, please click on "Assign". |
|
|
Auto status is set by the function "Calculate". FreqCoord did not find a compatible frequency for this device. To make the operation of this device possible, reduce the intermodulation compatibility level in the "Calculation Settings" menu, or use on device level a Spacing Profile with less conservative values and "Calculate" again. |
Location of use “Multiple/All”
Multiple/All is intended for use with requests in which equipment will be used in multiple locations (e.g., ENG-Teams). This location’s intermodulations are calculated with any other location.
Location of use “Unassigned”
If a request is listed in the location of use “Unassigned”, it means that the user who submitted the request has not chosen a default location set under "Event settings". To make the "Check" and "Calculate" operation possible, you must first assign all requests in the 'Unassigned' location of use to a default location of use.
Move Device
If you have to split requests to multiple locations of use, you can drag & drop devices to other requests. To do this, select a device first and drag it then on another request.
Batch Editor
The Batch Editor enables you to streamline your tasks by performing various operations on multiple devices simultaneously. Within the Batch Editor, you can perform the following operations:
· Set status: Accept, Deny, Reset Status
· Delete multiple devices
· Assign/change the Calculation Groups for multiple devices
· Change the Spacing Profile for multiple devices
· Set a Control Status for multiple devices
· Partial check: Checks the compatibility of the preferred frequencies only for selected devices
· Partial calculation: Calculates new frequencies only for selected devices
Comments of users
You may receive comments from users on request -or channel level. FreqCoord indicates comments as following in the tree-view.
|
New comment |
Read comment |
Description |
|
|
|
Request/device has a comment |
|
|
|
Request has no comment, but at least a device within the request has a comment |
|
|
|
Request has a comment and at least one device within the request has a comment |
|
|
Request has a read comment and at least one device within the request has a new comment |
|
|
|
Request has a new comment and at least one device within the request has a read comment |
|
Request status
The following requests status are set automatically, depending on the specified user interactions:
|
Request status |
Description |
|
|
draft |
The request has been created by the requesting user but not yet submitted to the Frequency Manager. The Frequency Manager cannot see your devices and process your request until the user have submitted its request. |
|
|
submitted |
The request has been submitted by the request-owner and its ready to be coordinated. Calculated frequencies and assigned device status are not yet visible to the request-owner. Furthermore, these requests are indicated with a !-sign in the tree-view. |
|
|
to review |
The request-owner has been informed (Inform User), that the frequencies have been assigned and the assigned frequencies are visible to him/her. The containing channels have the status changed, denied or assigned by authority. The request-owner has the possibility to accept the changed frequencies, but do not must. |
|
|
completed |
The request-owner has been informed (Inform User), that the frequencies have been assigned and assigned frequencies visible to him/her. The containing channels have all the status allowed. |
|
|
archived |
The request status archived can be set immediately after the user has shut off the devices and won’t use them again (instead of deleting the request). The frequencies are immediately free to use for other users and the request can be reactivated any time. Archived requests are included in reports and statistics, and they are available to copy to future events. |
|
Furthermore, the request status can also be set manually by the frequency manager. Only the following manual status changes are recommended:
|
Request status |
Recommended in case of: |
|
draft à submitted |
The request owner has created a request and has added devices to it but have not submitted the request. After the oral arrangement with the request-owner the request can be pulled to the coordination page. |
|
submitted à draft |
After submitting a request, all submitted devices are not anymore editable. On demand of the request-owner, the request can be pushed back to him. The request-owner can make changes to the existing devices and need to submit the request again. |
|
submitted à to review/completed |
On-site changes of frequencies are orally agreed between frequency manager and request-owner. Therefore, no information email (Inform User) is necessary, but the change shall be deployed to the user. In this case, set status “to review” or “completed” manually. |
To set a request status manually, select the desired request, click on the edit symbol and select the desired request status from the dropdown.

Important note:
The status of requests with “to review” and “completed” are switched back to “submitted” automatically when you add a device or edit a preferred frequency in the corresponding request. Please press “inform user” again or if already informed set the status manually.
Request owner’s view
The frequency manager has always the opportunity to see the request owner’s view of the request. Select the desired request and click on the request number, which is linked to the request owner’s view.

8.1.1 Calculation Settings per Device
FreqCoord supports multiple operation modes per device, reflecting the capabilities of modern wireless systems — from top-tier narrowband solutions to WMAS technology.
When switching the Operation Mode, spacing and intermodulation parameters adapt automatically in the background. Frequency managers can also select different Spacing Profiles per Operation Mode — Resilience optimized, Normal or Frequency optimized and custom profiles— to adjust the calculation security level per channel. This enables prioritization of critical channels and more efficient use of the available spectrum, even in complex scenarios.
1. Select Operation Mode or Spacing Profile which should be used for calculation
2. View parameters of different Spacing Profiles behind each operation mode by selecting a Profile from the dropdown. Custom Profiles may be added trough the +Button.
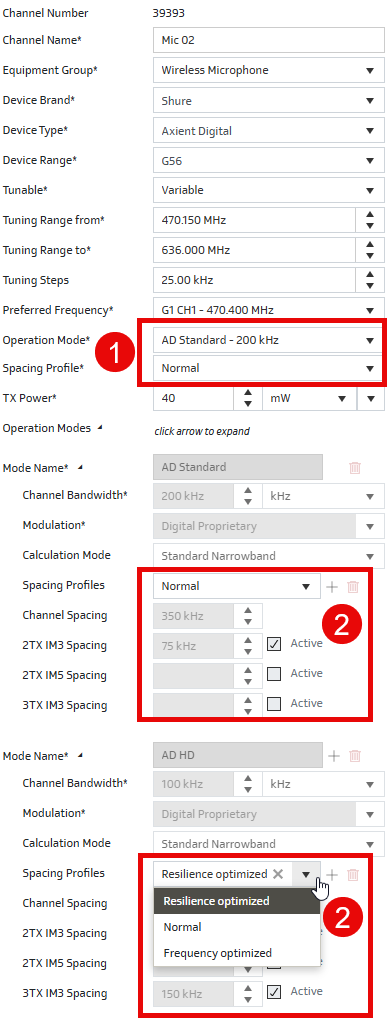
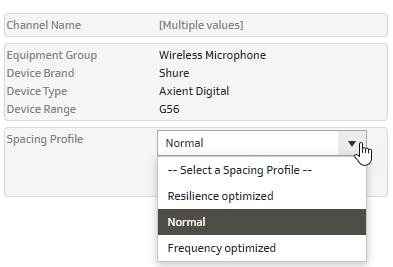
Selecting a Spacing Profile for multiple devices at the same time can be done in the batch editor.
8.1.2 Global Calculation Settings
In this popup, you can configure how FreqCoord calculates frequency conflicts. The setup of this page affects the functions “Check” and “Calculate”. The standard setup after creating a new event is the most conservative.

Checkbox Matrix
In this checkbox matrix, it is possible to specify which device frequencies are involved in direct hit and intermodulation calculations. By default, for all device frequencies within a location of use, intermodulations are being calculated. For direct hits, FreqCoord calculates across all locations of use. A particular case is the location of use "Multiple/All". Here, FreqCoord calculates intermodulation with any other location’s device frequencies.
1. All Locations of use are listed in bold. All requests are listed below each location of use.
2. Enable/disable direct hit calculation between the location of use listed in the column above.
3. Enable/disable intermodulation calculation overall requests for this location.
4. Enable/disable intermodulation calculation within the request in this row.
Intermod Bypass Window
Here you can exclude from intermodulation calculation those device frequencies that are more than a specific distance apart.
Hint: If you need more compatible frequencies, set the checkbox for 3TX IM3 Bypass Window.
MIC / In-ear Spacing
The calculation of FreqCoord will automatically group Mic and In-ear frequencies within a request and let the space indicated in MHz between these two groups. As a default, this function is active.
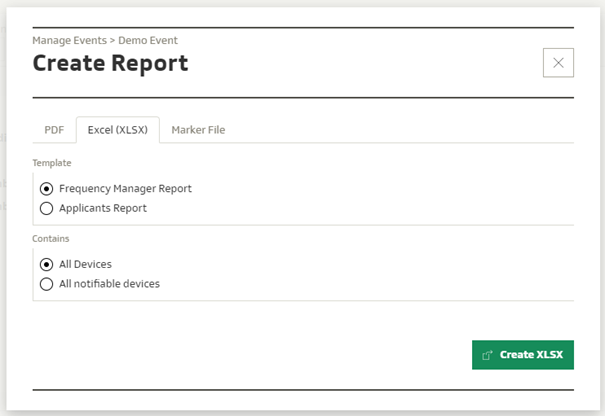
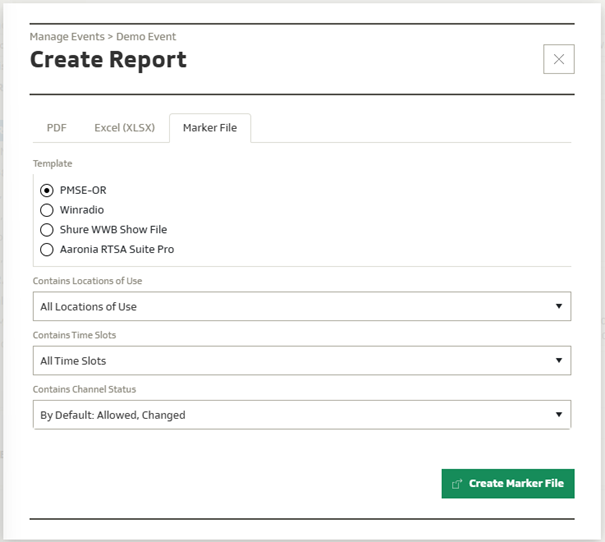
8.1.3 Create Report
In this popup menu you may export your event and device data in different data formats. There are three tabs available.
In this tab you may export a pdf file, which you can filter, group and sort as you wish. If you select the template “Bulk Download User Reports” you can generate a pdf file per request-owner. The time slot filter only appears, if there are any time slots added as described in Time slots.
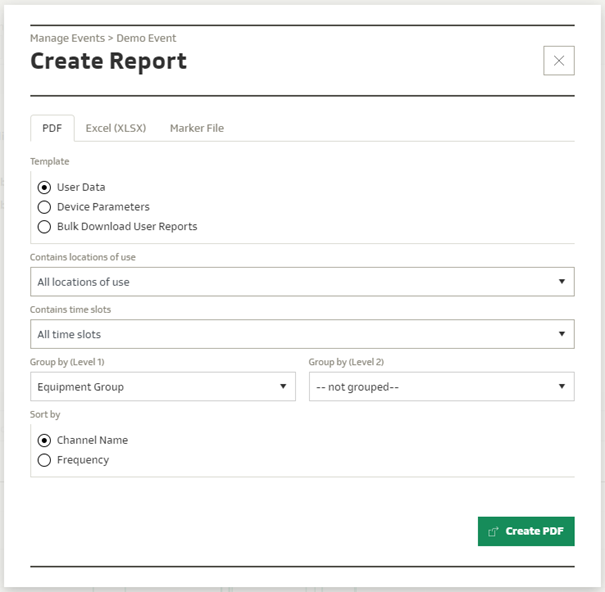
Excel (XLSX)
In this tab you may export the data in excel forms. As Excel provides filter, sort and show/hide functions, FreqCoord does not provide any of them.
Monitoring Marker File
In this tab you can export the assigned frequencies in different formats and is only in the FreqCoord License packages available. After exporting, the file can be imported to your monitoring system to show a marker overlay for quick recognition of uncoordinated frequencies in use. The Shure Wireless Workbench export may have some additional value for partial collection of requests in FreqCoord.
8.2 Event Administration
On this page, you can send invitations to potential participants for an event. In the list, you can see an overview of everyone to whom you have sent an invitation. You can see the status of each invitation, which will be set automatically by the recipient’s response. You can also set this status manually by clicking on the edit button.

Click on the "Send New Invitation" button to open the email editor.
8.2.1 Invitation Email
In the "To" field, you can search for all registered FreqCoord users or manually type new email addresses.
The standard text in the Message field contains event- and user-specific data, such as the following:
|
Dear #User# |
Personal salutation for each recipient will be filled automatically |
|
Event information |
Request deadline, event name, and location |
|
Register link |
Event-specific registration link |
|
No frequencies link |
User-specific unsubscribe link; each recipient gets a specific link |
|
Signature |
Signature of the currently logged in user |

8.3 Show and Modify Interference
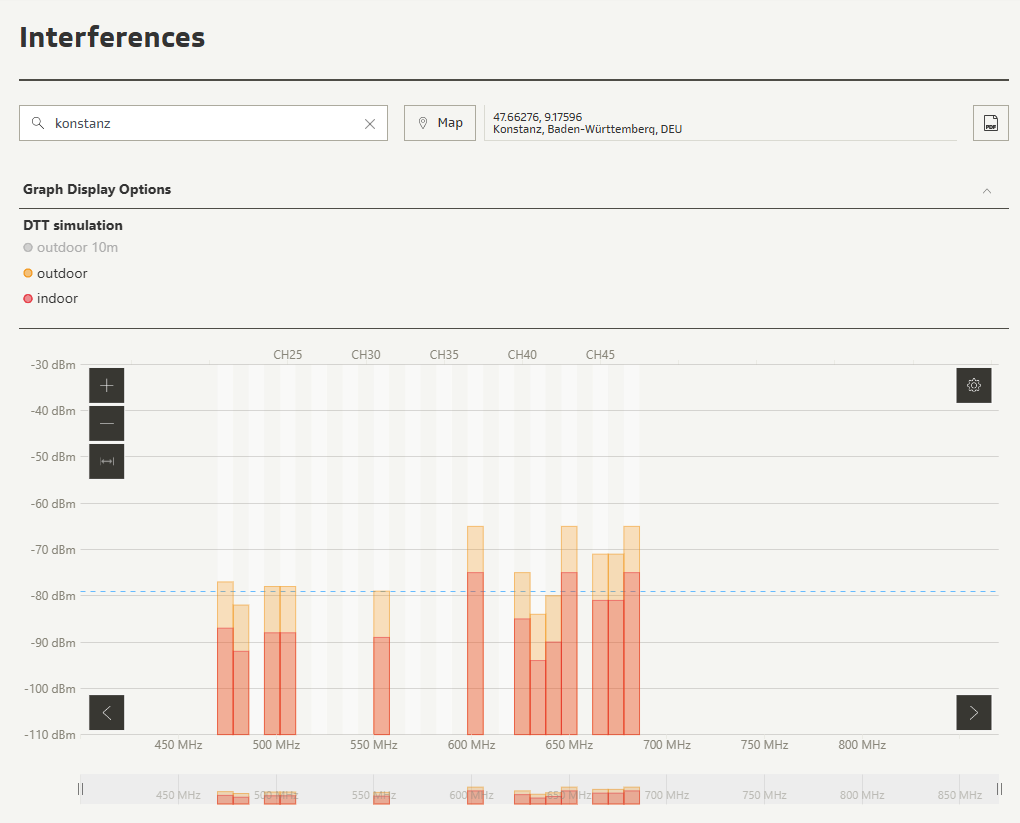
In this view, FreqCoord shows you the DTT interference simulation for the event location. You can block frequencies here to avoid interferences between your coordinated devices and interferences.
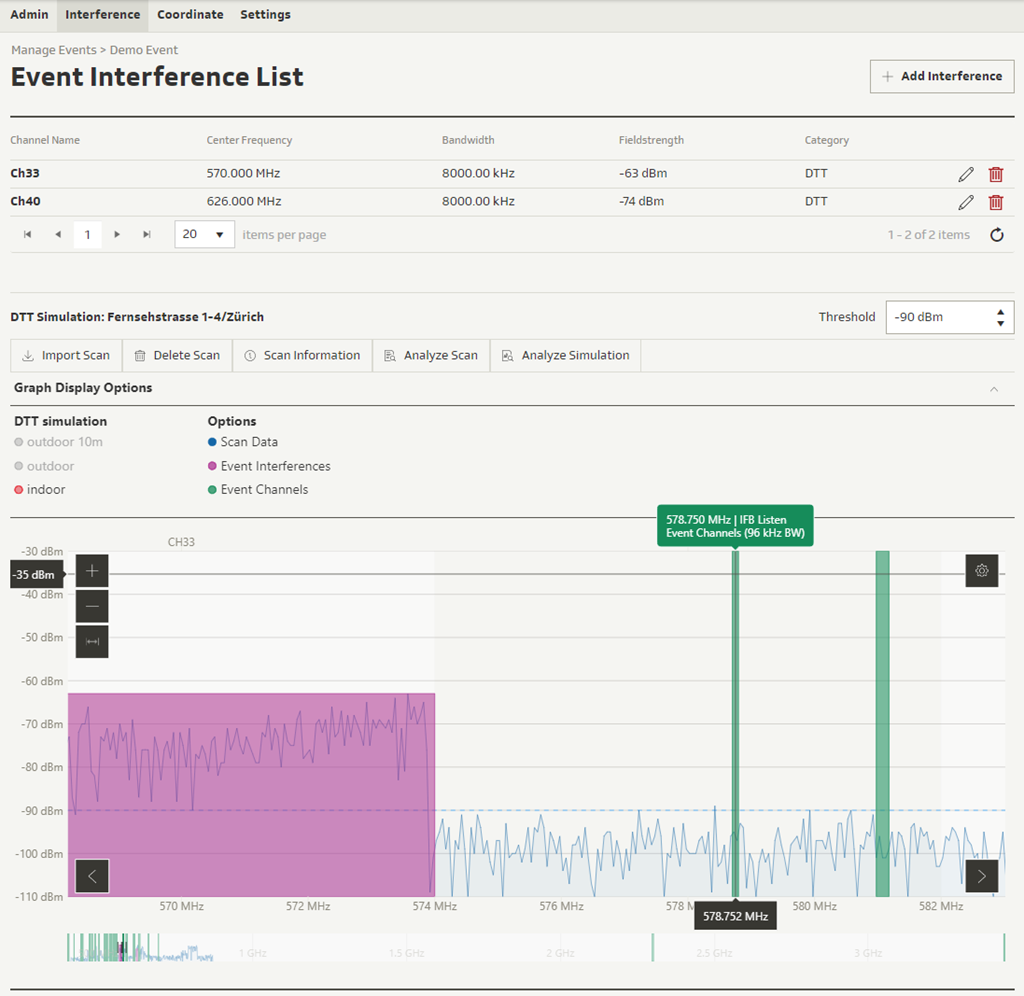
You can choose whether the event is indoors or outdoors and set the interference threshold. Then click on "Analyse simulation" to set the event’s interference situation. The listed "Event Interferences" will be used to detect frequency conflicts together with the device requests. Please note that you can currently only enter thresholds in dBm regardless of the unit set for the spectrum graph. With the "Add Interference" button, you can manually add further interference frequencies.
If you have a FreqCoord License, there is the function available to import a RF Scan. Identical as in the simulation part, you can analyse the scan to block the frequency ranges above the threshold line.
The following scan formats are supported:
· Shure Wireless Workbench (*.sdb2 & *.sdb3)
· Sennheiser WSM (*.csv)
· Wisycom Manager (*.csv)
· RF-Explorer (*.csv)
· RF Venue Spectrum Recorder (*.csv)
· Signal Hound Spike (*.csv)
· PMSE-OR (*.txt)
8.4 Event Settings
8.4.1 Spacing

Coordinate this group
If you don’t like to coordinate one of these equipment groups, you can deactivate them. The users cannot anymore sign up devices of this group. As a standard setup, all groups are activated.
General Spacing Settings
You can change the general spacing settings, which will be used to detect carrier frequency to intermodulation conflicts only when no device-specific data is available. For all devices with values in the 2TXIM3 / 2TXIM5 / 3TXIM3 data field, changes here on this page will not affect their calculation.
Interference settings
Define here the minimum distance of a calculated frequency to an interference. The DTT regular spacing defines the minimal spacing from the DTT center frequency to a calculated frequency. The DTT Intergap spacing is a field implemented for a future functionality and has no effect at the moment.
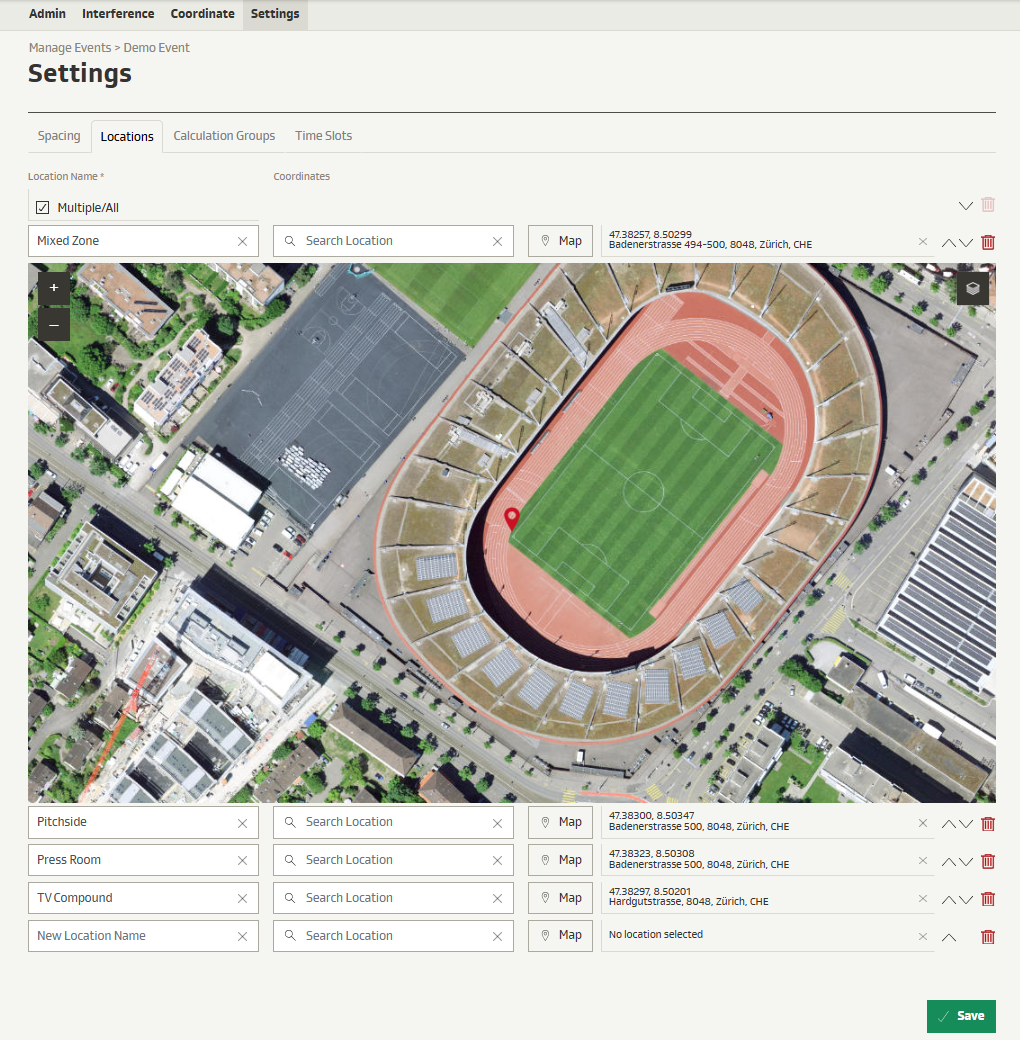
8.4.2 Location of Use
You may also enter default "locations of use", which are available as choices for users creating a request for an event. These locations will be used for intermodulation calculation. “Multiple/All” is a default location and cannot be deleted but deactivated. It is intended for use with requests in which equipment will be used in multiple locations (e.g. ENG-Teams). This location’s intermodulations are calculated with any other location. To use the functions "Check" and "Calculate", all requests must be assigned to a location listed here. Optional, for each entry a specific location (address, geo-coordinates or map picking) can be specified. These coordinates are not considered in the frequency calculation. With the up/down arrow, the locations can be sorted how they will appear in the select dropdown of the user while creating a request and the coordinate window.
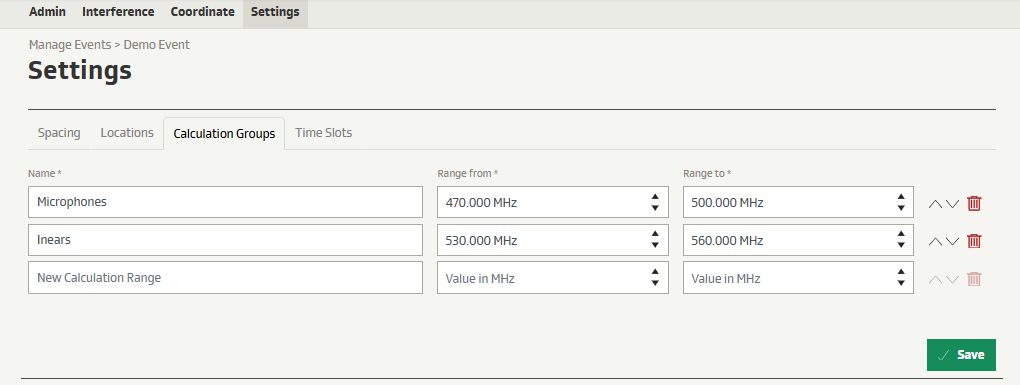
8.4.3 Calculation Groups
In this tab, you can set up "Calculation Groups". This feature is in the FreqCoord License packages available.
With many devices offering wide tuning ranges, overlaps—especially between wireless microphones and in-ear monitors—often require semi-manual planning. Calculation Groups let you define sub-ranges for a group of devices, narrowing their effective tuning range during calculation. This ensures clean separation between equipment groups and reduces manual effort.
After adding at least one calculation group here in the “event settings”, the group becomes selectable under “coordinate” in each device detail view or in the batch editor. After assigning a group to a device, FreqCoord only calculates frequencies within the common range of the assigned calculation group and the tuning range of the device.
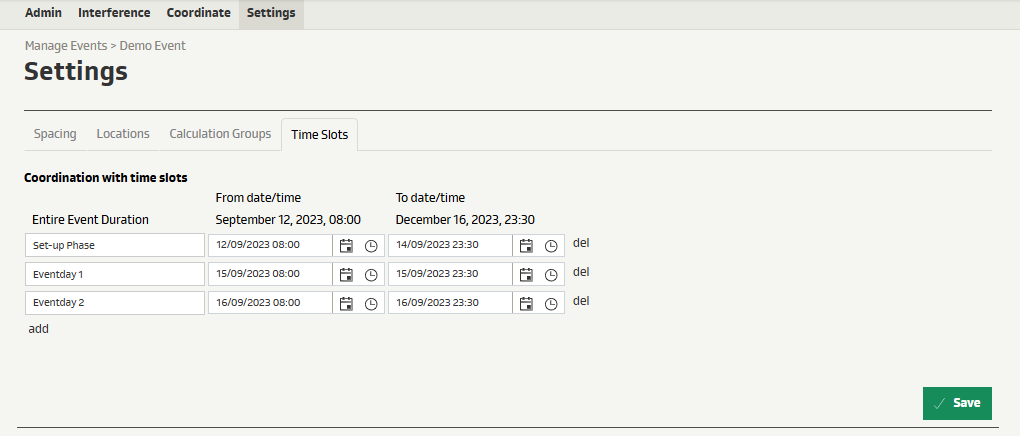
8.4.4 Time slots
In this tab, you can set up the "coordination with time slots" function. This function is in the FreqCoord License packages available.
The purpose of this function is to use the frequency spectrum more efficient for events. For example, you may have a permanent setup over the whole event duration and a daily changing setup (e.g., Festivals). For example, the same frequencies used only on event day 1 (user 1) can be re-used on event day 2 (user 2). The calculation of FreqCoord takes this into account.
The function is disabled if there is only the entry "entire event duration". As soon as you add another time slot, the function will be enabled. While signing up, the users can select these time slots as a period of use. Each request will be automatically matched to a time slot according to his period of use.
9 Interference Situation
The menu item "Interference" enables you to find out about the interference situation in a particular location in Switzerland and Germany. FreqCoord displays the interference situation on a spectrum diagram for a selected location. After searching or selecting a location on the map, you can display the spectrum view of the DTT simulation. The blue dashed line indicates the threshold value. If a DTT channel has a higher value as the dashed line, it is not recommended to use a wireless device on the same tv channel. The search result can be exported on a pdf-report.
10 My Devices
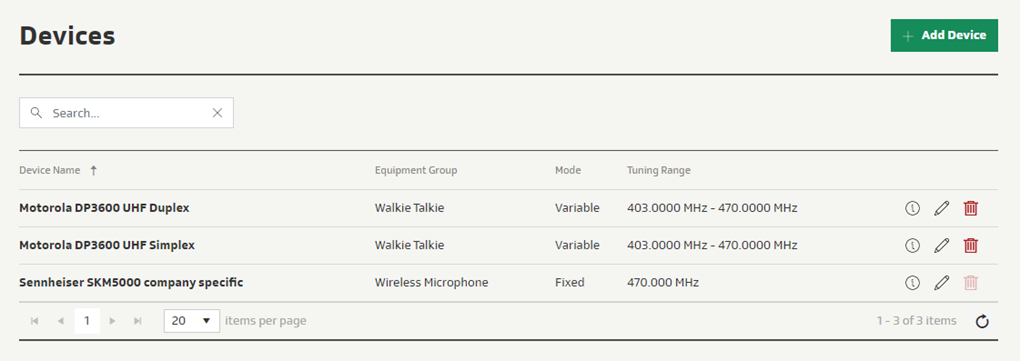
10.1 Devices
A general device library is available to all FreqCoord users containing the most common devices on the market. The application administrator is responsible for this library. If you cannot find a particular device, please contact support@freqcoord.com
You can also store specific devices owned by your company (as HF officer) or by you (as Individual User) in the "Devices" menu. Please make sure that you don’t create devices that are already provided in the general device library.
The general device library and your specific device presets will be available when you add devices to an event request, thereby enabling all parameters to be filled automatically.
This page shows you all your specific devices:
On this page, the following functions are available:
|
|
Add a new specific device preset |
|
|
Show device preset details |
|
|
Edit device preset parameters |
|
|
Delete device preset |
If the delete button is shown greyed (not selectable), this device is used in a device group. Please remove this device first from all device groups. This function will then be available.
When you create/edit a specific device, you
will be asked to supply the following information: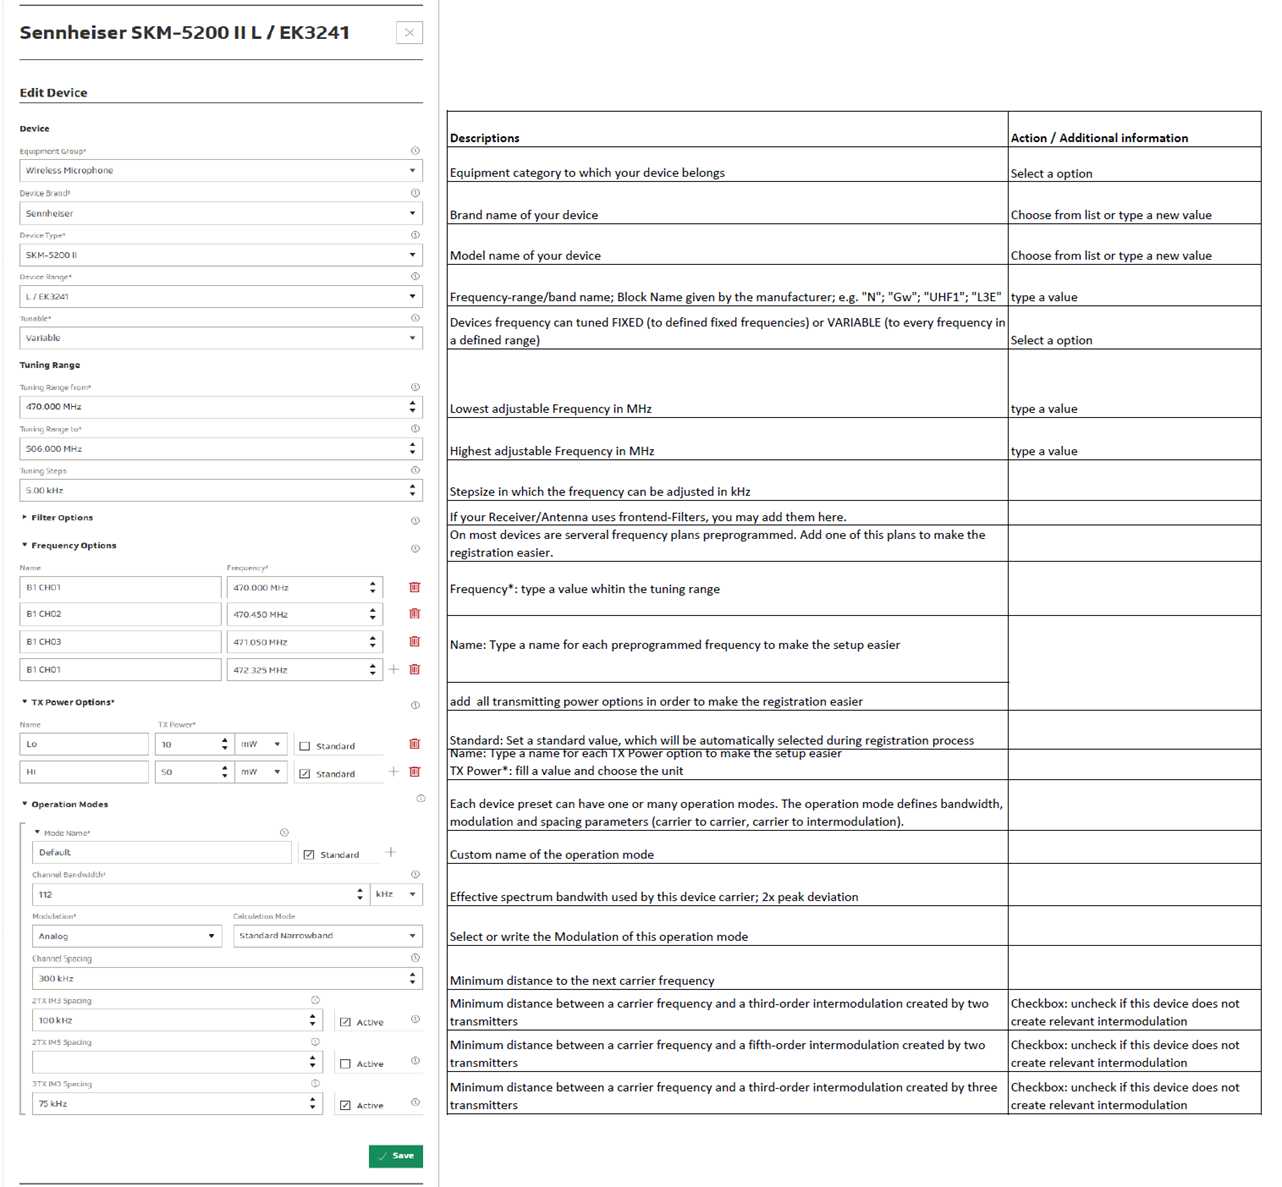
10.2 Device Groups
To make the event request process even more comfortable, it is also possible to group devices into "Device Groups". These groups can be added together to an event request. Device Groups can be created to preconfigure, for example, a flight case, a Studio, or an OB-Van with multiple devices of different types.
The page "Device Groups" shows all your preconfigured device groups:
The following functions are available:
|
|
Create a new group of predefined devices |
|
|
Show device group details |
|
|
Edit device group |
|
|
Delete device group |
When you add/edit a device group, you will be asked to supply the following information:
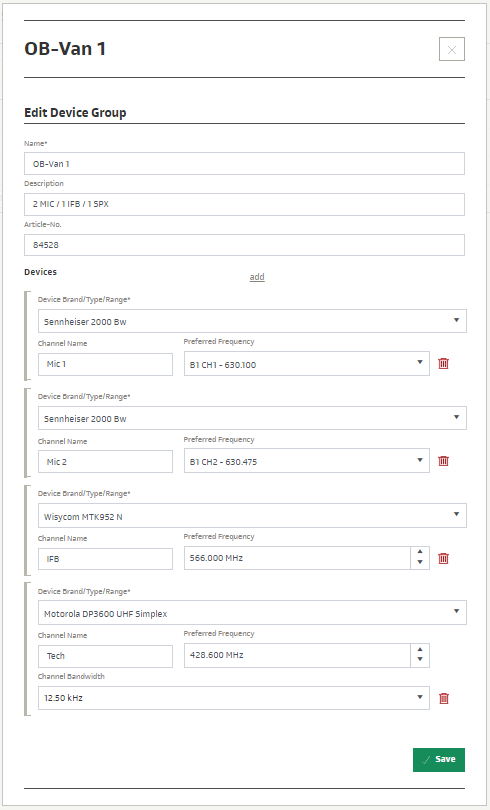
In the "Device Brand/Type/Range" field, you can select any device from the common device library or your company-specific device library. The other fields may be used to preconfigure your kit of devices to save time during the registration process. That the user can sign up with the "save all" button, you need to preconfigure all channel names and preferred frequencies.
10.3 Licences
In the submenu "Licences", you can sign up permanent/long term licences issued by a frequency authority in a specific country (mostly your home country). Please note that you only should sign up licenses here, which are valid for the whole country (without geographical restrictions). While signing up devices for an event, FreqCoord recognises these licences automatically and add the declaration and licence number to the channel.

The following functions are available:
|
|
Add a new licence |
|
|
Filter the licence table according to a keyword |
|
|
Show the licence details |
|
|
Edit the licence |
|
|
Delete the licence |
When you create/edit a licence, you will be asked to supply the following information:
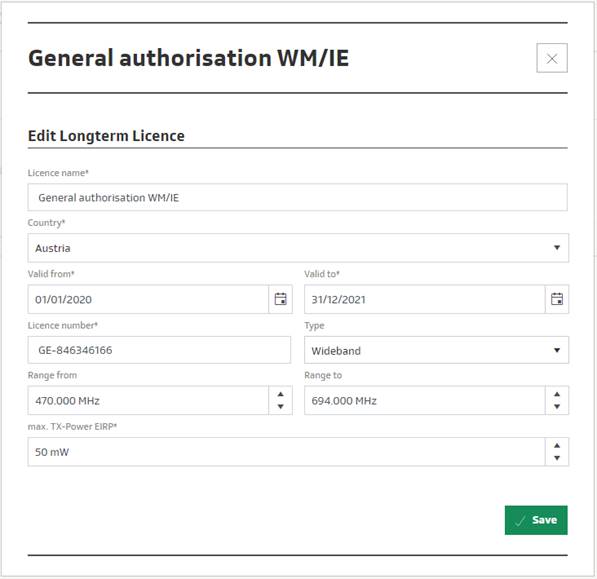

Depending on the selection of the licence type, you will be asked to sign up a frequency range or single frequencies that are licensed.
11 My Company
11.1 FreqCoord Licenses
In the menu item "FreqCoord Licences", all your licences will be listed, which you have bought in the past. Also, you can buy a premium licence.

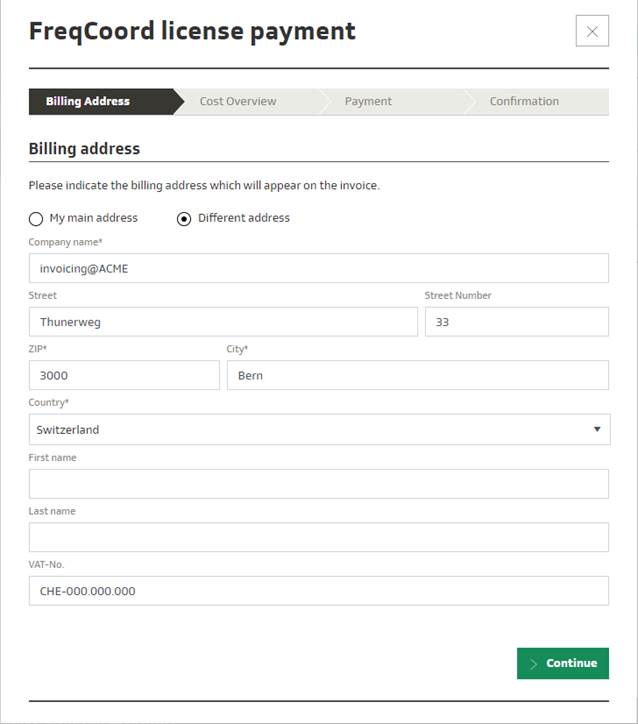
After clicking on the "Add Premium License" button, a popup with the payment wizard will be started. In the first step, you can select whether you like to use your company’s main address as the billing address or a different one. The information will be prefilled with the information stored in the menu item "edit company". After clicking on the "Continue" button, you will get to the next step.
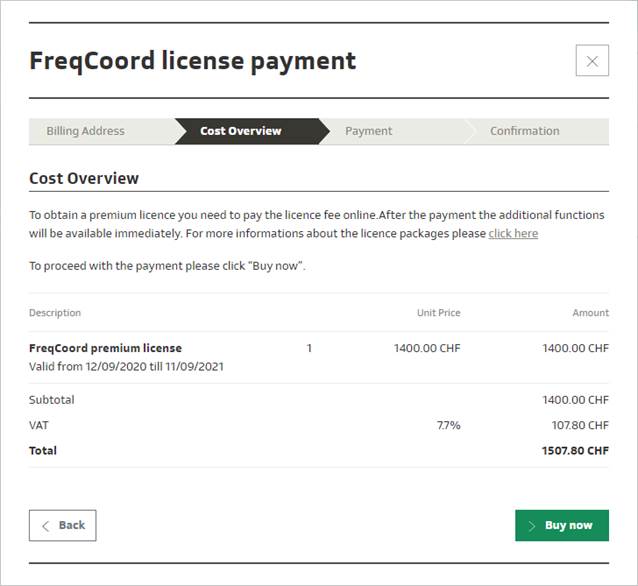
In the second step, you will see the cost overview of the licence. To execute the payment, you can click on the "buy now" button. In the third step of the payment, you will be redirected to a secure payment process where you will be asked to fill your credit card information. As soon as the payment is successfully completed, the additional features will be activated automatically.
11.2 Edit Company
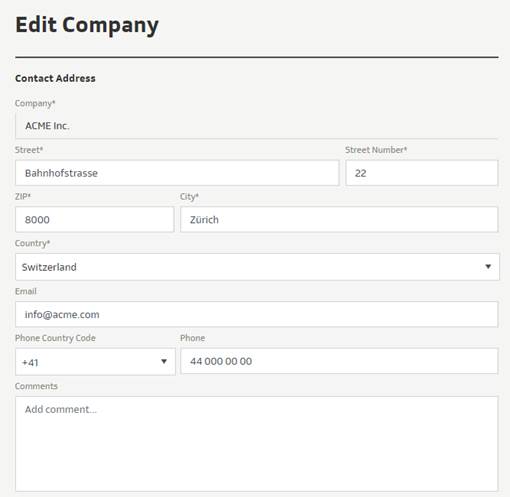
As an HF-Officer or an Individual User, you have the register "Edit Company" available. Here you can edit the company’s Contact address and select if the billing address should be the contact address or a different one. Also, you can add the VAT-Number of your company. The information will only be used to invoice Premium and Single Event licences and to generate application forms for frequency authorities.
![]()

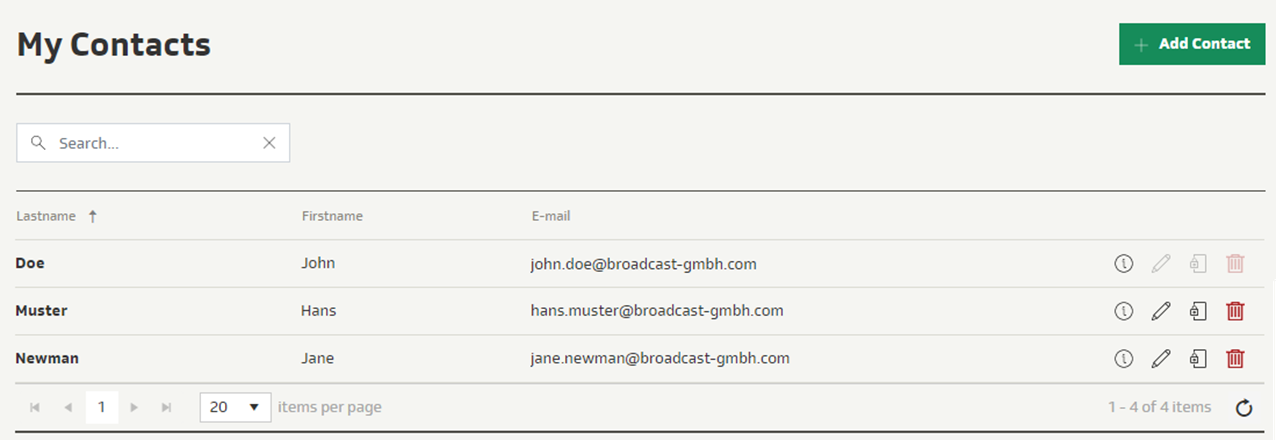
11.3 Contacts
The menu item "Contacts" FreqCoord displays a table with the contacts of your company. This register only is displayed to Company-Users and HF-Officers.
FreqCoord offers tools for viewing and changing contact data. The availability of these tools depends on your account’s role and the organisation you belong to.
|
|
Filter the contact table according to a keyword |
|
|
Users with the role "HF-Officer" can create new user accounts within the company |
|
|
Show the contact details of the user |
|
|
Edit the user information (only HF-Officer) |
|
|
Delete the user (only HF-Officer) |
|
|
Reset password for the user (only HF-Officer) |
HF officers can create new accounts for their organisation by clicking on "Add Contact". They can also delete user accounts. FreqCoord does not send notifications to users when their account is deleted.
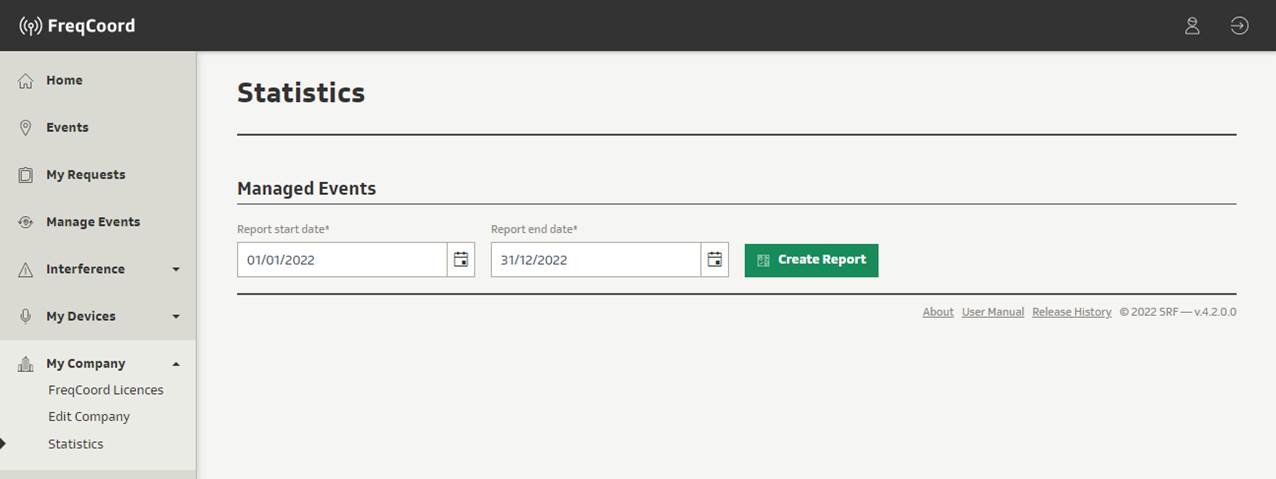
11.4 Statistics
In the menu item “Statistics” you may export detailed evaluations from events you or your company have coordinated. On the report you find for example per equipment group or per frequency band the number of channels and the spectrum used. To create a report, choose first the desired date range.
12 Event Locations
A frequently used event location and its permanently installed equipment can be stored in FreqCoord and used as a template for creating new events. This way, you do not have to re-enter the frequencies and the permanent equipment for events at this location.
12.1 Create an Event Location Template
Only the application administrator can add new event locations. If you want to add an event location as a template to FreqCoord, please send your request via email to support@freqcoord.com. Please mention in the email the following information:
- Event Location Name
- Street / Number
- ZIP Code / City
- Geo-Coordinates (Optional)
After creating the event location, the application administrator will assign you as “location template editor” and hereby grants you the right to add/edit the event location’s frequencies.
12.2 Add/Edit Permanent Frequencies
The menu item "Locations" displays a table of the Event Locations that you have rights to maintain. Click the edit icon on the right to maintain/edit.

An event location shall be divided and organized in spatial separated “Location of uses”, which could be for example different rooms, studios or stages. The “Location of use” will build later the base for the intermodulation-calculation. Then additional “Location of use” can be added. Click the devices icon on the right to add or edit devices
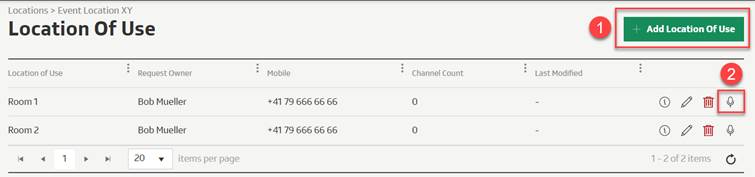
Follow instructions in chapter 7.1.2 Standard Mode to add devices.
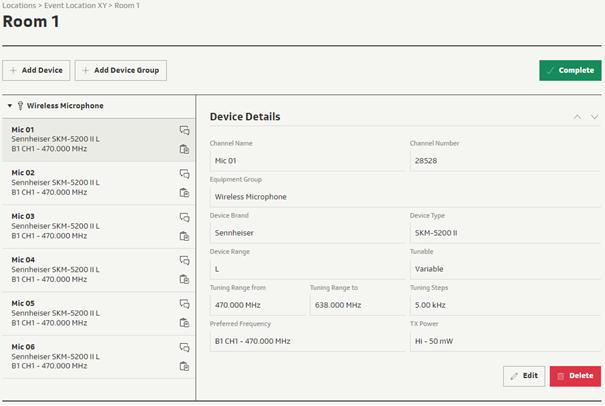
At this point the event location template is completed.
12.3 Using an Event Location Template
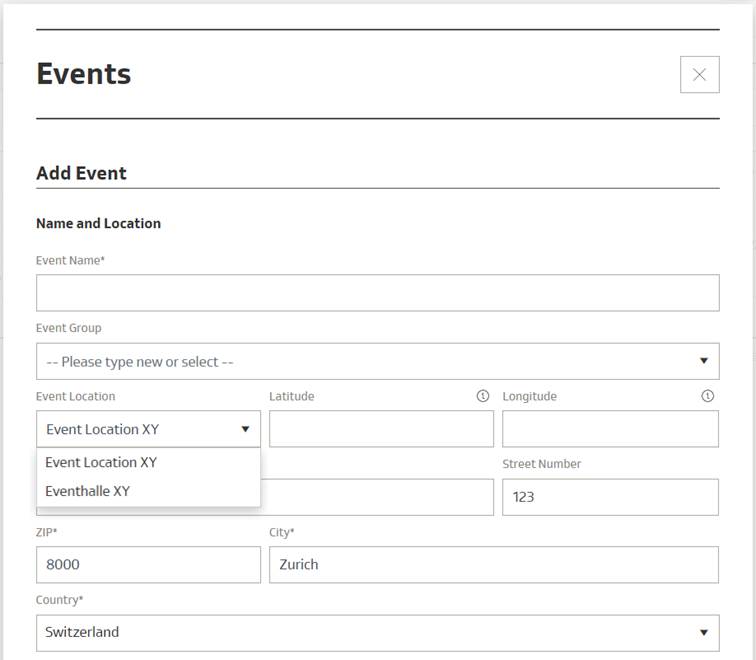
An event location can be used as a template for a new event by selecting it from the dropdown "Event Location" while creating a new event. Please note, that the event location information (Location of use, devices) will be copied to the event at the moment when selecting the event location (mostly when creating the event). If the template is updated after this selection, the event will not be automatically updated.
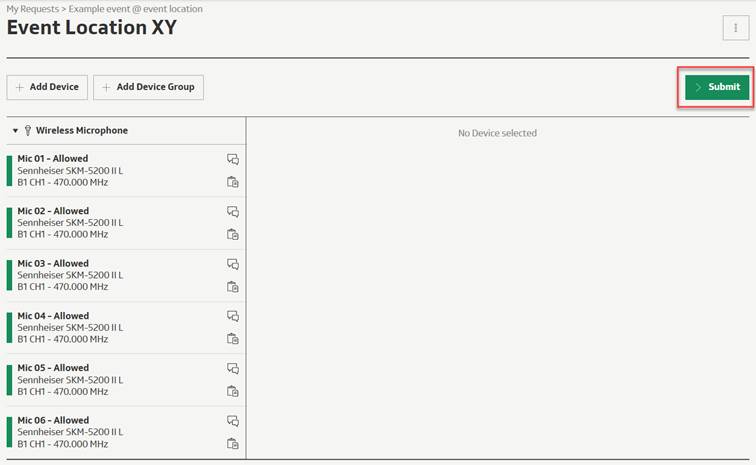
12.4 Approve and Submit
When an event is created using a location with an event location template, the location template editor will receive an email notification. To avoid unwanted and automatic delivery of the location’s frequencies, the location template editor needs to submit all the event location requests. Frequencies of an event location are automatically approved by FreqCoord without any calculation of compatibility, assuming that the location template editor has checked the compatibility of the event location’s frequencies prior adding them as a template.
13 Support
For user administration, non-event-related questions, and application support, please contact support@freqcoord.com.
Please direct all event-related questions to the frequency manager responsible. You can find the contact data in the event details.
14 FAQ
Q: Does FreqCoord work with Internet Explorer?
A: No, Internet Explorer is not supported, and the application does not work correctly.